Device Management
The Device Management section of ElauPro allows you to organize and configure all devices in your KNX installation. This includes managing device categories, defining device types, and configuring the technical properties of each device.
Categories
Categories in ElauPro determine how devices are organized and displayed in the HyperVisu mobile application, making it easier for end-users to navigate and control their smart home systems.
Using Predefined Categories
ElauPro comes with several predefined categories that cover the most common device groups in KNX installations:
- Access the Categories page:
- Navigate to the "Devices" section in the main menu
- Click on the "Categories" button to view the list of available categories
- Predefined Categories include:
- Lights
- Sockets
- Heating
- Shutters
- Security
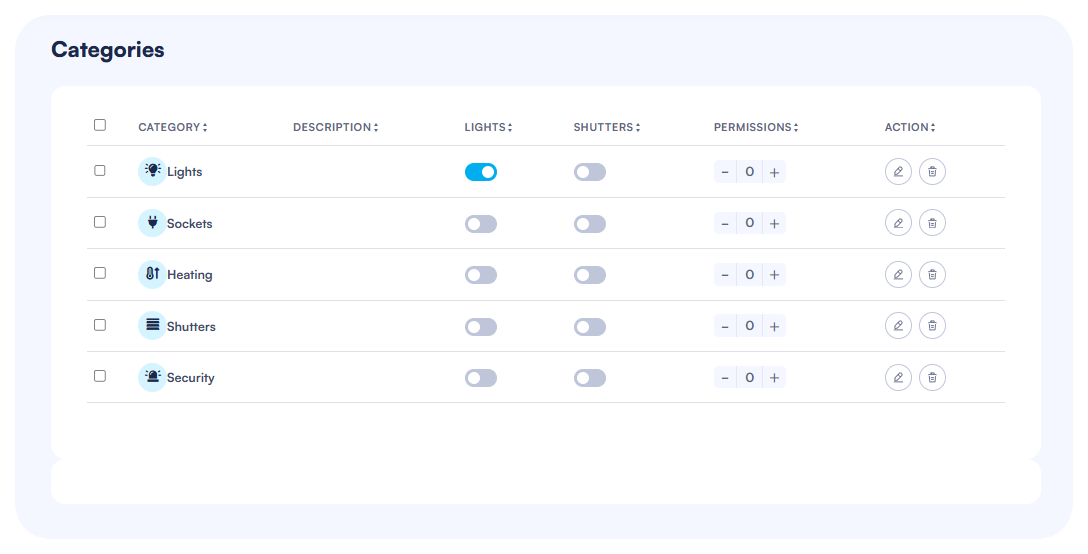
- Understanding Category Properties:
- Each category displays configuration options for global commands
- Permission levels can be set to control user access
[SCREENSHOT : 19 - Categories]
Creating Custom Categories
If the predefined categories don't meet your project requirements, you can create custom categories:
- Add a New Category:
- Click the "Add Category" button in the top-right corner of the Categories page
- Configure Basic Information:
- Select an appropriate icon from the icon library
- Enter a name for the new category
- Add a description if needed
- Save the New Category:
- After configuring all properties, click "Save"
- The new category will appear in the categories list and be available for device assignment

Configuring Category Properties
Each category in ElauPro can be configured with specific properties that define its behavior in the system:
- Global Commands:
- Enable or disable global commands for the category by toggling the respective switches
- "Lights" column: Toggle to enable all lights on/off functionality
- "Shutters" column: Toggle to enable all shutters up/down functionality
- Permission Settings:
- Set permission levels (1-5) to control access in the mobile application
- Level 1: Any user can access this category
- Level 5: Only administrator access
- Use the "+" and "-" buttons to adjust the permission level
- Action Options:
- Edit: Click the pencil icon to modify category properties
- Delete: Click the trash icon to remove a category

Device Types
Device Types define the technical characteristics of devices in your KNX system, including what channels they require on KNX actuators and how they appear in the visualization.
Working with Predefined Device Types
ElauPro includes a range of predefined device types for common KNX devices:
- Access Device Types:
- Navigate to the "Devices" section in the main menu
- Click on the "Type" button to view available device types
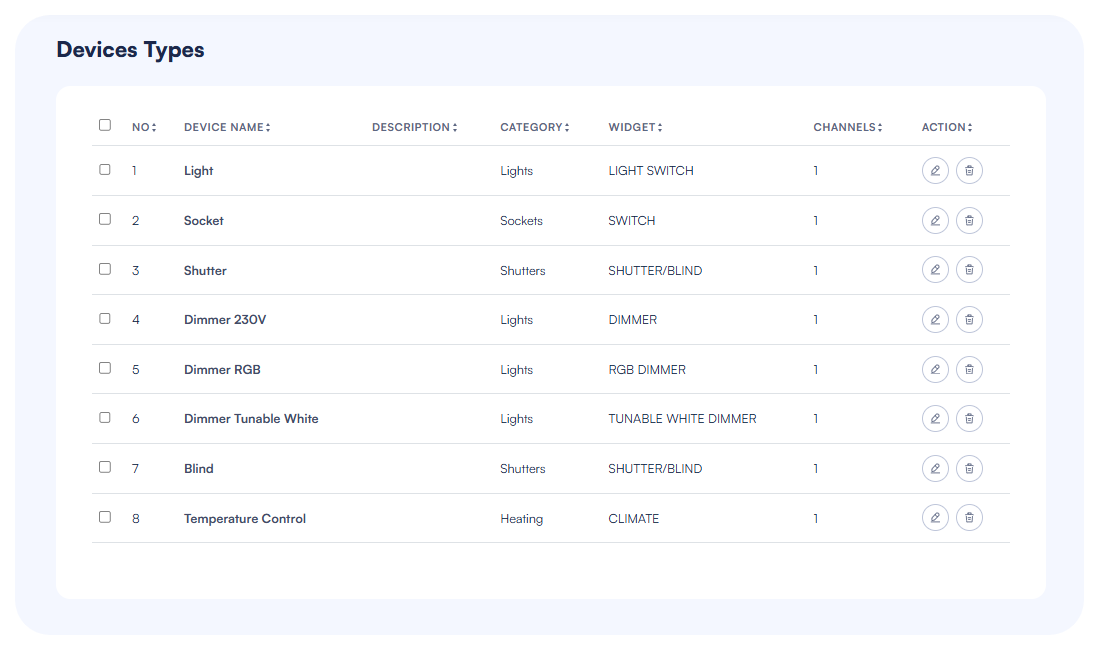
- Predefined Types include:
- Light
- Socket
- Shutter
- Blind
- Dimmer 230V
- Dimmer LED
- Dimmer RGB
- Dimmer DALI
- Dimmer Tunable White
- Temperature Control
- Understanding Type Properties:
- Each type shows its name, description, category, widget type, and required channels
- The channel count indicates how many actuator channels are needed for this device
Creating Custom Device Types
For specialized devices not covered by the predefined types, you can create custom device types:
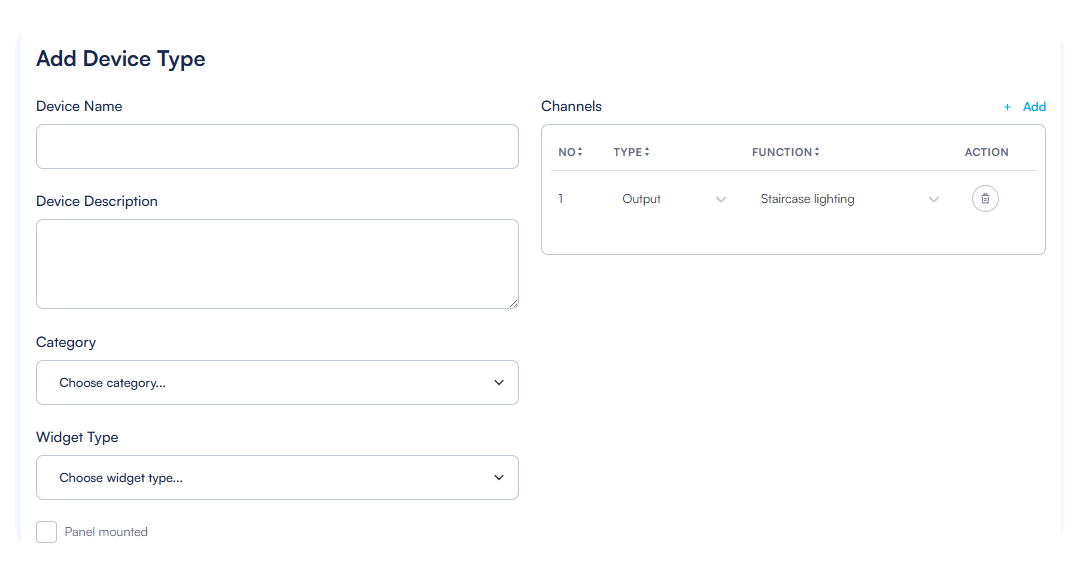
- Add a New Type:
- Click the "Add Type" button in the top-right corner of the Device Types page
- Enter Basic Information:
- Device Name: Enter a descriptive name (e.g., "LED Light")
- Device Description: Add optional details about this device type
- Select the appropriate Category from the dropdown menu
Configuring Channel Types and Functions
When creating or editing a device type, you must define its channel requirements:
- Add Channels:
- Click the "Add" button in the Channels section
- For each channel, configure:
- Channel Type: Select from "Output" or "Input"
- Function: Choose the appropriate function (e.g., "Dimmer LED", "Switching", "Blind/Shutter")
- Configure Multiple Channels:
- Complex devices like RGB lighting may require multiple channels
- Add all necessary channels to ensure proper functionality
- Each channel will be mapped to a physical actuator channel during panel configuration
- Panel Mounted Option:
- Check "Panel mounted" for devices that will be installed in the electrical panel rather than in rooms
Widget Assignment
The widget type determines how the device will be displayed and controlled in the HyperVisu mobile application:
- Select Widget Type:
- Choose from available widget types based on device functionality:
- SWITCH: Simple on/off control
- LIGHT SWITCH: On/off control with light icon
- DIMMER: Slider control for dimmable lights
- RGB DIMMER: Color picker and dimmer for RGB lights
- TUNABLE WHITE DIMMER: Color temperature and brightness control
- SHUTTER/BLIND: Up/down/stop controls for shutters
- CLIMATE: Temperature control with setpoint adjustment
- Choose from available widget types based on device functionality:
- Widget :
- The selected widget type determines the appearance and functionality in the mobile app
- Choose a widget type that provides the appropriate controls for end-users
- Save Configuration:
- After configuring all properties, click "Save" to create or update the device type
- The device type will now be available when adding devices to rooms
When creating device types, consider the actual hardware capabilities of your KNX devices to ensure proper functionality. The device type configuration forms the basis for all further device configuration in your project.
Devices
After configuring categories and device types, you can begin adding actual devices to the rooms in your project. This process connects the physical KNX devices in your installation to your ElauPro configuration.
Adding Devices to Rooms
The Devices List page provides an overview of all devices in your project, organized by building, floor, and room:
- Access the Devices List:
- Navigate to the "Devices" section in the main menu
- The Devices List displays all rooms in your project
- Expand a floor section to see rooms within that floor
- Add a Device to a Room:
- Navigate to the specific room where you want to add a device
- Click the "+ Add Device" button in the top-right corner of the room section
- A dialog box will appear for adding a new device
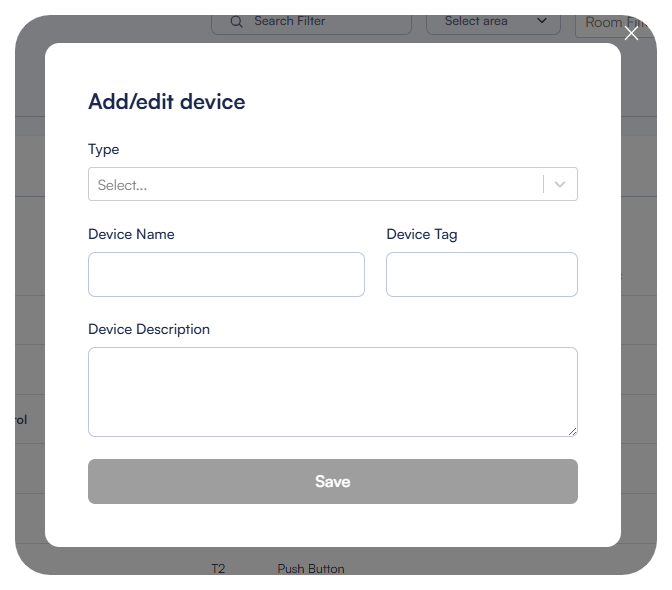
- Select Device Type:
- In the Add/edit device dialog, choose a device type from the dropdown menu
- The available types include both predefined and custom device types
- The selected type determines the device's properties and required actuator channels
- Complete Device Information:
- Device Name: Enter a descriptive name (e.g., "Light 1")
- Device Tag: This field can be filled automatically when linked to an actuator or can be manually entered
- Device Description: Add optional details about this specific device
- Save the New Device:
- Click "Save" to add the device to the room
- The device will appear in the devices list for the selected room
Managing Device Properties
Once devices are added to rooms, you can manage their properties and configurations:
- View Device Details:
- The Devices List shows all devices with their properties in columns
- Information displayed includes device name, description, tag, type, and category
- Scene assignments are visible with toggle switches
- Edit Device Properties:
- Click the pencil icon in the Action column to edit a device
- The Add/edit device dialog will open with the current device information
- Modify any fields as needed and click "Save" to update the device
- Delete Devices:
- Click the trash icon in the Action column to remove a device
- Confirm the deletion when prompted
- Note that deleting a device will remove all its configurations and links to actuators
- Filter and Search:
- Use the search field to find specific devices by name or tag
- Use the area selector to filter devices by area
- Use the room selector to filter devices by room

Working with Device Tags
Device tags in ElauPro serve as unique identifiers for each device and are crucial for KNX integration:
- Understanding Device Tags:
- Tags are used to identify devices in the KNX system
- They appear in group addresses and in the actuator channels descriptions
- Tags can be generated automatically or assigned manually
- Tags are very useful to filter lists and quickly find a device or an address
- Automatic Tag Generation:
- When a project is configured with automatic tag generation, tags follow the defined pattern
- Tags typically include a device type code, and a sequential number
- Example: "L1" might represent "Living Room Light 1"
- Manual Tag Assignment:
- Enter a custom tag in the Device Tag field when adding or editing a device
- Ensure tags are unique across your project to avoid conflicts
- Consider using a consistent naming convention for easier management
- Tag Usage:
- Tags appear in the ElauPro interface, reports, and exports
- Tags are used in the KNX group address structure and actuators channels
- Electricians may refer to tags in the electrical schematics
- Editing Tags:
- Tags can be modified by editing the device
- If you change a tag after KNX configuration, you may need to update your ETS project accordingly
Scenes
Scenes allow users to control multiple devices simultaneously with a single command, creating the perfect ambiance for different activities or situations in a smart home.
Creating and Naming Scenes
ElauPro allows you to configure up to four KNX scenes that are configured in the KNX actuators, additional scenes can still be added in ETS or using the HyperVisu application features:
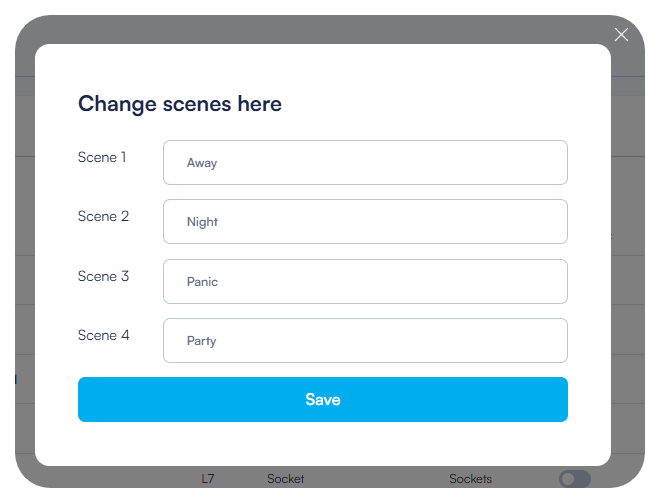
- Access Scene Configuration:
- From the Devices List page, click the "Edit Scenes" button in the top-right corner
- A dialog box titled "Change scenes here" will appear
- Name Your Scenes:
- The dialog displays input fields for Scene 1 through Scene 4
- Enter meaningful names that describe the scene's purpose or ambiance:
- Examples: "Away" (for when leaving the house)
- "Night" (for evening lighting)
- "Panic" (for security scenarios)
- "Party" (for entertainment settings)
- Save Scene Names:
- Click "Save" at the bottom of the dialog to confirm your scene names
- The scene names will now appear as column headers in the Devices List
Assigning Devices to Scenes
After defining scene names, you can assign devices to participate in each scene:
- View Scene Columns:
- In the Devices List, each device row includes toggle switches for each of your named scenes
- The column headers display the scene names you configured
- Assign Devices to Scenes:
- For each device, toggle the switch in the corresponding scene column
- Blue/active toggle: The device will participate in this scene
- Gray/inactive toggle: The device will not be affected by this scene

- Configure Multiple Rooms:
- You can assign devices from different rooms to the same scene
- For example, an "Away" scene might include lights in multiple rooms
- A "Night" scene might involve only devices on one floor
- Scene Behavior:
- When a scene is activated on KNX:
- Devices included in the scene will be set to the predefined state for that scene
- Other devices will not react to the scene
- The exact behavior depends on the device type and KNX configuration
- When a scene is activated on KNX:
- Scene Combinations:
- Devices can belong to multiple scenes
- For example, a living room light might be included in both "Night" and "Party" scenes
- The same device may behave differently in different scenes based on your KNX configuration
5.5. Output Channel Types
When configuring device types in ElauPro, you need to select the appropriate channel type for each device. The channel type determines the functionality of the device and which actuator modules can be used to control it.
Understanding Channel Types
Each channel type in ElauPro corresponds to a specific function in a KNX actuator:
- Channel Definition:
- Channels represent the physical connections on KNX actuators
- Each channel type has specific technical characteristics and capabilities
- The channel type determines what kind of device can be connected to it
- Channel Selection:
- When creating or editing a device type, you must specify the required channel type
- The correct channel type ensures compatibility between the device and the actuator
- Selecting the wrong channel type may result in improper functioning of the device
Channel Type Details
Switching Channels
These channels are used for simple on/off control of devices:
- Switch On/Off 16A (Pxx): For high-power devices up to 16A, typically power outlets
- Switch On/Off 10A (Lxxx): For standard lighting and lower-power devices
- Staircase lighting (Lxxx): For lighting with automatic time-off functionality
- Flash (Lxxx): For devices that require momentary activation
Shutter and Blind Channels
These channels are dedicated for motor control:
- Shutter Control (Mxx): For standard roller shutters, requires 2 channels per device
- Blind Control (Mxx): For venetian blinds with slat angle adjustment, requires 2 channels
Valve Control Channels
These channels are designed for HVAC control:
- Valve control On/Off (Vxx): Simple on/off control for heating/cooling valves
- Valve control PWM (Vxx): Pulse-width modulated control for proportional valve operation
- Valve limit values control (Vxx): valves control based on limit values
Temperature Control Channels
These channels are for temperature regulation:
- Temperature control PI (Hxx): Proportional-Integral control for precise temperature regulation using PWM output
- Temperature control 2-points (Hxx): Simple on/off control with hysteresis
- Temperature control PI 0-10V (Hxx): PI control with 0-10V analog output
Dimming Channels
These channels control various types of dimmable lighting:
- Dimmer 230V (Lxxx): For phase-cut dimming of 230V incandescent/halogen lights
- Dimmer 0-10V (Lxxx): For devices controlled by 0-10V analog signals
- Dimmer LED (Lxxx): Optimized for driving low voltage LED lighting (12-24VDC)
- RGB dimmer (Lxxx): For RGB color lighting, requires 3 channels
- RGBW dimmer (Lxxx): For RGBW color lighting with white channel, requires 4 channels
- Tunable White dimmer (Lxxx): For adjustable color temperature white lighting, requires 2 channels
- DALI dimmer (Lxxx): For controlling DALI lighting systems
Other Channels
- Analog output 0-10V (Axx): General-purpose analog output for various controls
Tag Prefix Convention
The tag prefix helps identify the type of device in your KNX system:
- Lxxx: Used for lighting-related devices (standard lights, dimmers, RGB)
- Pxx: Used for power outlets
- Mxx: Used for motors (shutters, blinds)
- Vxx: Used for valves (heating, cooling)
- Hxx: Used for heating/temperature control
- Axx: Used for analog outputs
The 'xx' portion is typically replaced by a room code and sequential number during automatic tag generation.
Channel Color Coding
ElauPro uses color coding to help identify channel types in the interface:
- Light Blue: Basic switching functions
- Cream: Motor control functions
- Light Green: Analog output functions
- Light Red: Dimming functions
- Light Purple: DALI control
This color coding makes it easier to identify the required channel types when configuring panels and assigning devices to actuator channels.
On this page
Need additional help?
Our support team is available to answer your technical questions.
Contact support