Search
Close this search box.
Search
Close this search box.

Visualization

The Visualization section allows you to manage how users interact with the installation through the HyperVisu mobile application. This includes configuring user accounts, setting up communication protocols, managing widgets that represent your devices, and connecting to the HyperVisu server.

User Management #

The User Management section enables you to create and configure users who will access the HyperVisu mobile application to control the KNX installation.

Creating Users #

To create a new user for the HyperVisu application:

  • Navigate to the Visualization section from the main menu.
  • Click on the “Users” tab.
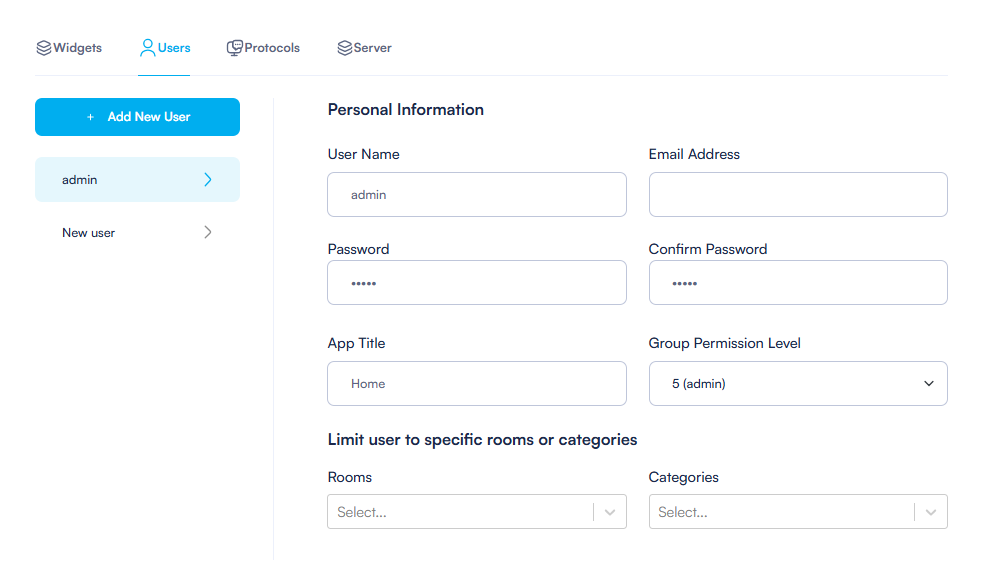
  • Click the “+ Add New User” button at the top of the user list.
  • In the Personal Information section, enter the following details:
    • User Name: Enter a username for the user.
    • Email Address: Enter the user’s email address.
    • Password: Create a secure password.
    • Confirm Password: Re-enter the password to confirm.
    • App Title: Specify the title that will appear on the user’s HyperVisu application home page.


Note: A default admin user is automatically created when you set up your project.
Setting Access Permissions #

Each user in the HyperVisu application can be assigned different permission levels to control what they can access and modify:

  • In the user creation or editing form, locate the “Group Permission Level” field.
  • Select a permission level from 1 to 5.
  • Users with higher permission levels have access to more features and control options in the mobile application.
  • The administrator level (5) has unrestricted access to all functions and settings.

  #

Room and Category Restrictions #

For enhanced security and personalized user experience, you can restrict which rooms and categories a user can access:

  • In the user creation or editing form, find the “Limit user to specific rooms or categories” section.
  • For room restrictions:
    • Click the dropdown under “Rooms”
    • Select the specific rooms this user should have access to
    • Users will only see and control devices in these selected rooms
  • Similarly, you can restrict access by categories (like lighting, heating, etc.) if needed.
  • If no restrictions are set, the user will have access to all rooms and categories according to their permission level.
  • Click “Save” after configuring all user settings.


Tip: Creating users with specific room and category restrictions is useful for guest access or when different family members or employees need access to different parts of the building.

Protocol Configuration #

The Protocol section allows you to configure the communication between the HyperVisu application and your KNX installation.

KNX Gateway Setup #

To set up the KNX gateway:

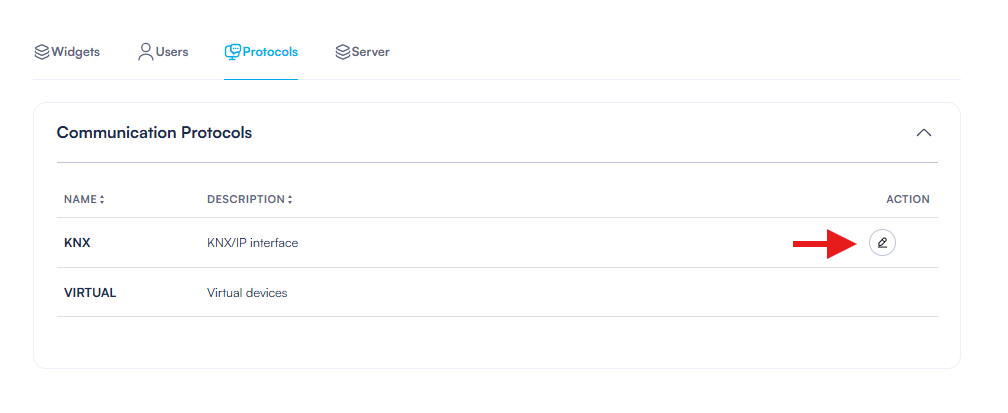
  • In the Visualization section, click on the “Protocols” tab.
  • The system displays available protocols, with KNX listed by default.
  • Click the edit button (pencil icon) next to the KNX protocol to configure it.

Communication Parameters #

Configure the KNX gateway communication parameters in the Edit Protocol dialog:
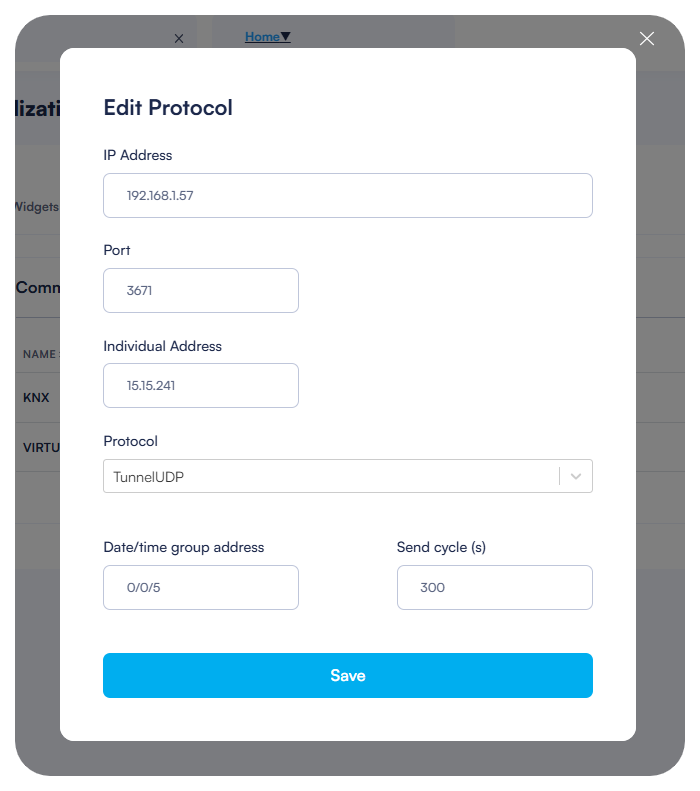
  • Enter the following information:
    • IP Address: The IP address of your KNX/IP interface (e.g., 192.168.1.57)
    • Port: The communication port (typically 3671 for KNX/IP)
    • Individual Address: The individual address assigned to the HyperVisu server on the KNX bus (e.g., 15.15.241)
    • Protocol: Select the communication protocol (typically TunnelUDP)
  • These settings must match the configuration of your KNX/IP interface for successful communication.

Date and Time Synchronization #

HyperVisu can synchronize date and time information with your KNX installation:

  • In the Edit Protocol dialog, locate the “Date/time group address” field.
  • Enter the KNX group address that should receive date and time information (e.g., 0/0/1).
  • Set the “Send cycle (s)” value to specify how often the date and time information should be sent in seconds (e.g., 300 for every 5 minutes).
  • This feature helps maintain synchronized time across all KNX devices that use time-based functions.
  • Click “Save” to apply your protocol configuration.

Widget Management #

The Widget Management section allows you to configure how devices will be represented in the HyperVisu mobile application.

Automatic and Manual Widgets

ElauPro generates widgets automatically for devices that have been configured in your project, but you can also create widgets manually:
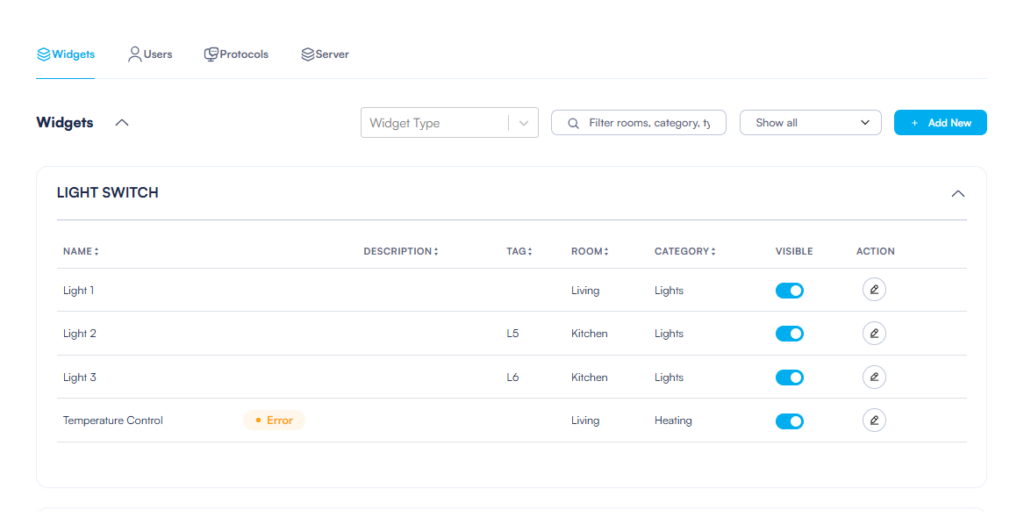
  • Navigate to the Visualization section and click on the “Widgets” tab.
  • The system displays widgets organized by type (e.g., LIGHT SWITCH, DIMMER).
  • You can filter widgets by:
    • Widget type (using the dropdown selector)
    • Search terms (using the search bar)
    • Created method (using the “Show all” dropdown)

Widgets are created in two ways:

  • Automatic widgets: Generated based on devices configured in your project
  • Manual widgets: Created by you for devices not configured through ElauPro

To add a manual widget:

  • Click the “+ Add New” button in the top right corner
  • Configure the widget properties as needed
  • Link it to KNX group addresses imported from your ETS project

  #

Widget Configuration #

To edit a widget:

  • Click the edit button (pencil icon) next to the widget in the list
  • In the Edit Widget form, you can modify:
    • Widget Name: The name that will appear in the HyperVisu application
    • Widget Description: Optional description for documentation purposes
    • Room: The location where the widget will appear in the application
    • Protocol: The communication protocol (typically KNX or VIRTUAL)
    • Widget Type: The type of control (e.g., switch, dimmer, analog input)
    • Widget sub-type: Additional specification for certain widget types
    • Category: The category under which the widget will be grouped
    • Visible: Toggle to show or hide the widget in the application

Object Properties #

Each widget has one or more objects that define its behavior and connection to KNX group addresses:

  • In the widget editing form, scroll down to the “Objects” section
  • For each object, is displayed:
    • Name: Identifier for the object (e.g., “Value”)
    • LOG: Enable to record historical values for trending
    • NOTIF: Enable notifications for this object
    • NOTIF VALUE: Set threshold values for notifications
    • TYPE: The data type of the object (e.g., 5.001 for percentage values)
    • ADDRESS: The KNX group address linked to this object
  • The address selector on the right allows you to browse and select from available KNX group addresses (after importing the group addresses in the KNX section)

To link a KNX group address to an object:

  • You can drag and drop a KNX group address from the address tree on the right side directly to the address column in the objects table
  • Only compatible datatypes are accepted when using drag and drop (the system validates compatibility automatically)
  • You can also manually enter an address when editing the object properties


Important: If no address is linked to a widget, an error will be displayed in the widget list to inform you that the configuration is not complete.
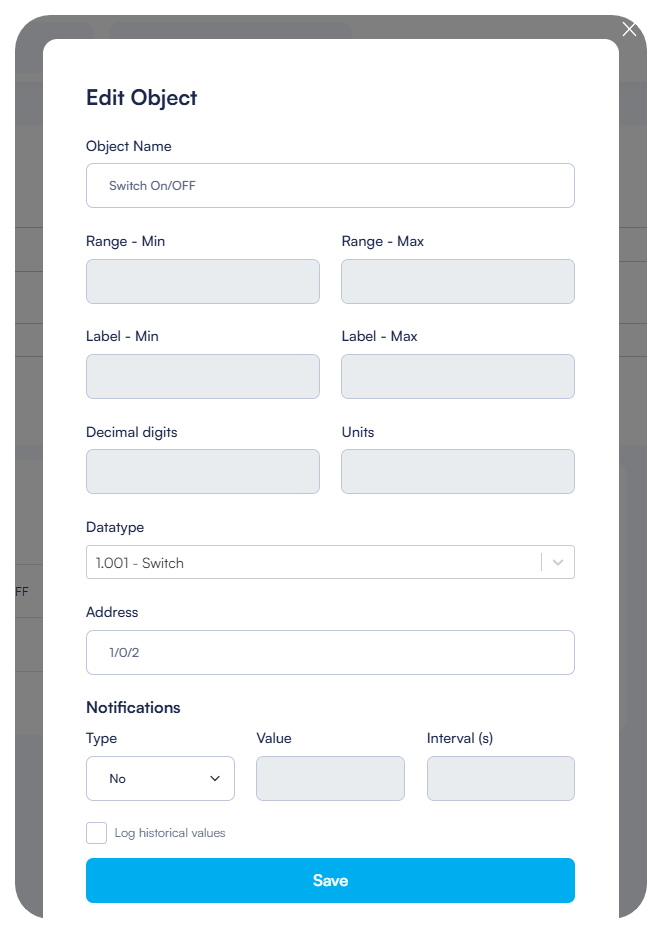
 

  • Click the edit button next to an object to modify its properties:
    • Object Name: Identifier for the object
    • Range – Min/Max: Value limits for display and control
    • Label – Min/Max: Text labels for minimum and maximum values
    • Decimal digits: Number of decimal places to display
    • Units: Measurement unit (e.g., W for watts)
    • Datatype: KNX datapoint type
    • Address: KNX group address
    • Notifications: Enable or disable notifications
    • Log historical values: Enable to record data for trending charts

Server Configuration #

Connecting to HyperVisu Server #

To connect your ElauPro project to a HyperVisu server:
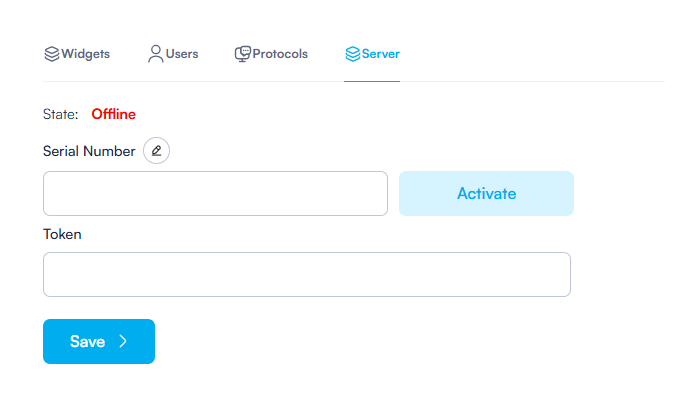
  • Navigate to the Visualization section and click on the “Server” tab.
  • The system displays the server connection status (Online or Offline).
  • To connect to a server, you’ll need:
    • Serial Number: The unique identifier of your HyperVisu server
    • Token: The authentication token for the server

These credentials can be found in the HyperVisu server’s administration page:

  • Access the HyperVisu server admin interface
  • Navigate to the Server section
  • Copy the Server SN and Server Token values

Enter these values in ElauPro and click “Save” to establish the connection. When successfully connected, the status will change to “Online”.


NOTE: If the server status indicates “Not Activated”, click the “Activate” button after copying the server SN and Server Token. The status should change to “Online”.

  #

Downloading Configuration #

Once connected to the HyperVisu server, you can deploy your configuration:
  • With the server showing “Online” status, you’ll see several action buttons:
    • Download: Transfers the configuration from ElauPro to the HyperVisu server
    • Admin Page: Opens the HyperVisu server administration interface
    • Web App: Opens the HyperVisu web application interface
  • When downloading the configuration, you can check the “Include users during download” option to also update user accounts.
  • After downloading, the HyperVisu server will immediately use the new configuration, making it available to all users of the mobile application.

Visualization Export #

If you prefer to manually transfer your configuration or need a backup:

  • Click the “Export” button in the top-right corner of the Visualization page.
  • The system will generate a zip archive with CSV files containing all your visualization configuration.
  • This file can be imported into the HyperVisu server through its administration interface:
    • Access the HyperVisu admin page
    • Navigate to the Import/Export section
    • Upload the exported CSV file


Note: Direct download through the Server tab is the recommended method for updating your HyperVisu server.

What are your feelings