Search
Close this search box.
Search
Close this search box.

Device Management

The Device Management section of ElauPro allows you to organize and configure all devices in your KNX installation. This includes managing device categories, defining device types, and configuring the technical properties of each device.

Categories #

Using Predefined Categories #

ElauPro comes with several predefined categories that cover the most common device groups in KNX installations:

Access the Categories page: #

Navigate to the “Devices” section in the main menu

Click on the “Categories” button to view the list of available categories

Predefined Categories include:
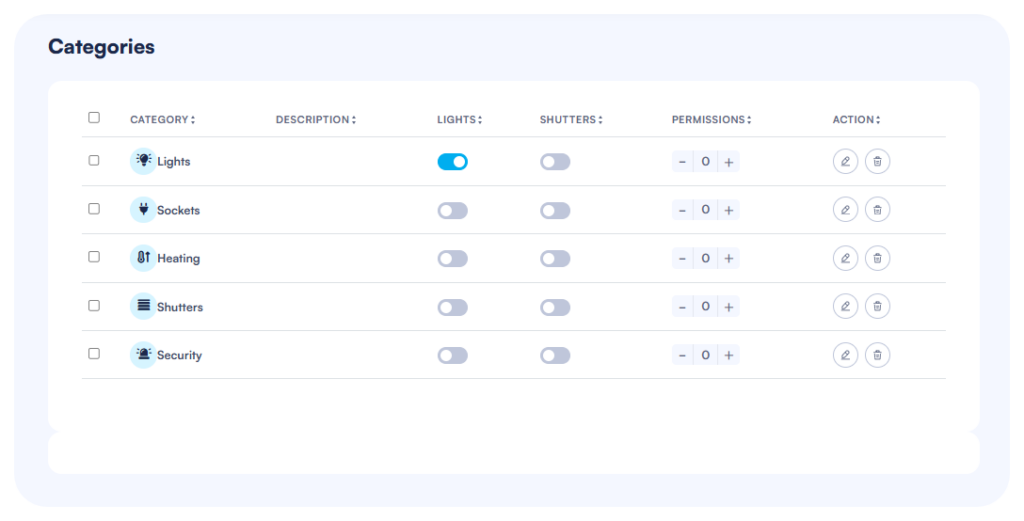
  • Lights
  • Sockets
  • Heating
  • Shutters
  • Security

Understanding Category Properties: #
  • Each category displays configuration options for global commands
  • Permission levels can be set to control user access

Creating Custom Categories #

If the predefined categories don’t meet your project requirements, you can create custom categories:
Add a New Category: #
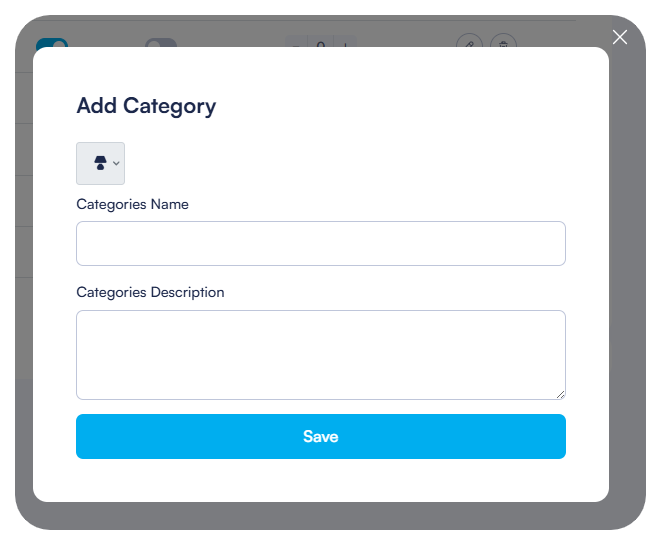
  • Click the “Add Category” button in the top-right corner of the Categories page
Configure Basic Information: #
  • Select an appropriate icon from the icon library
  • Enter a name for the new category
  • Add a description if needed
Save the New Category: #
  • After configuring all properties, click “Save”
  • The new category will appear in the categories list and be available for device assignment

Configuring Category Properties #

Each category in ElauPro can be configured with specific properties that define its behavior in the system:

Global Commands: #
  • Enable or disable global commands for the category by toggling the respective switches
  • “Lights” column: Toggle to enable all lights on/off functionality
  • “Shutters” column: Toggle to enable all shutters up/down functionality

Permission Settings: #
  • Set permission levels (1-5) to control access in the mobile application
  • Level 1: Any user can access this category
  • Level 5: Only administrator access
  • Use the “+” and “-” buttons to adjust the permission level

Action Options: #
  • Edit: Click the pencil icon to modify category properties

Delete: Click the trash icon to remove a category

Device Types #

Device Types define the technical characteristics of devices in your KNX system, including what channels they require on KNX actuators and how they appear in the visualization.

Working with Predefined Device Types #

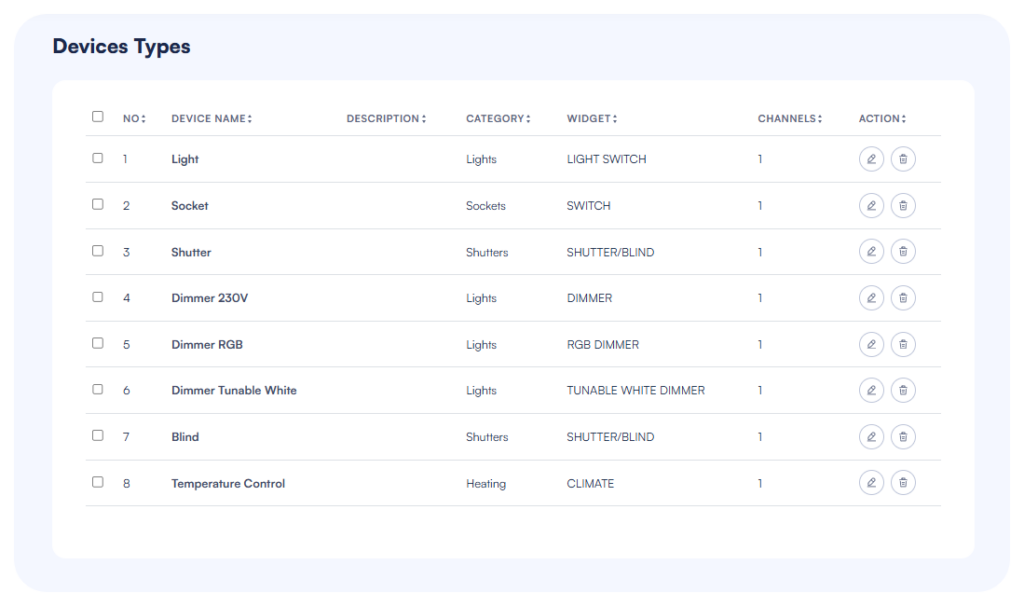
ElauPro includes a range of predefined device types for common KNX devices:
Access Device Types: #
  • Navigate to the “Devices” section in the main menu
  • Click on the “Type” button to view available device types.

Predefined Types include
: #
  • Light
  • Socket
  • Shutter
  • Blind
  • Dimmer 230V
  • Dimmer LED
  • Dimmer RGB
  • Dimmer DALI
  • Dimmer Tunable WhiteTemperature Control


Understanding Type Properties: #
  • Each type shows its name, description, category, widget type, and required channels
  • The channel count indicates how many actuator channels are needed for this device

Creating Custom Device Types #

For specialized devices not covered by the predefined types, you can create custom device types:
Add a New Type: #
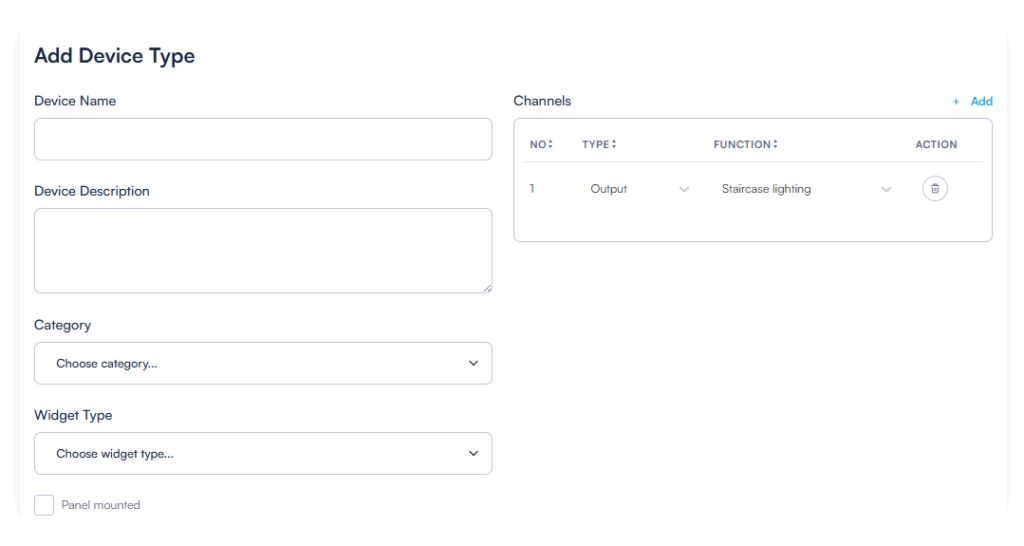
  • Click the “Add Type” button in the top-right corner of the Device Types page
Enter Basic Information: #
  • Device Name: Enter a descriptive name (e.g., “LED Light”)
  • Device Description: Add optional details about this device type
  • Select the appropriate Category from the dropdown menu

Configuring Channel Types and Functions #

When creating or editing a device type, you must define its channel requirements:

Add Channels: #
  • Click the “Add” button in the Channels section
  • For each channel, configure:
    • Channel Type: Select from “Output” or “Input”
    • Function: Choose the appropriate function (e.g., “Dimmer LED”, “Switching”, “Blind/Shutter”)
Configure Multiple Channels: #
  • Complex devices like RGB lighting may require multiple channels
  • Add all necessary channels to ensure proper functionality
  • Each channel will be mapped to a physical actuator channel during panel configuration
Panel Mounted Option: #

Check “Panel mounted” for devices that will be installed in the electrical panel rather than in rooms


Widget Assignment #

The widget type determines how the device will be displayed and controlled in the HyperVisu mobile application:

Select Widget Type: #
  • Choose from available widget types based on device functionality:
    • SWITCH: Simple on/off control
    • LIGHT SWITCH: On/off control with light icon
    • DIMMER: Slider control for dimmable lights
    • RGB DIMMER: Color picker and dimmer for RGB lights
    • TUNABLE WHITE DIMMER: Color temperature and brightness control
    • SHUTTER/BLIND: Up/down/stop controls for shutters
    • CLIMATE: Temperature control with setpoint adjustment
Widget : #
  • The selected widget type determines the appearance and functionality in the mobile app
  • Choose a widget type that provides the appropriate controls for end-users
Save Configuration: #
  • After configuring all properties, click “Save” to create or update the device type
  • The device type will now be available when adding devices to rooms


When creating device types, consider the actual hardware capabilities of your KNX devices to ensure proper functionality. The device type configuration forms the basis for all further device configuration in your project.

Devices #

After configuring categories and device types, you can begin adding actual devices to the rooms in your project. This process connects the physical KNX devices in your installation to your ElauPro configuration.

Adding Devices to Rooms #

The Devices List page provides an overview of all devices in your project, organized by building, floor, and room:
Access the Devices List: #
  • Navigate to the “Devices” section in the main menu
  • The Devices List displays all rooms in your project
  • Expand a floor section to see rooms within that floor
Add a Device to a Room: #
  • Navigate to the specific room where you want to add a device
  • Click the “+ Add Device” button in the top-right corner of the room section
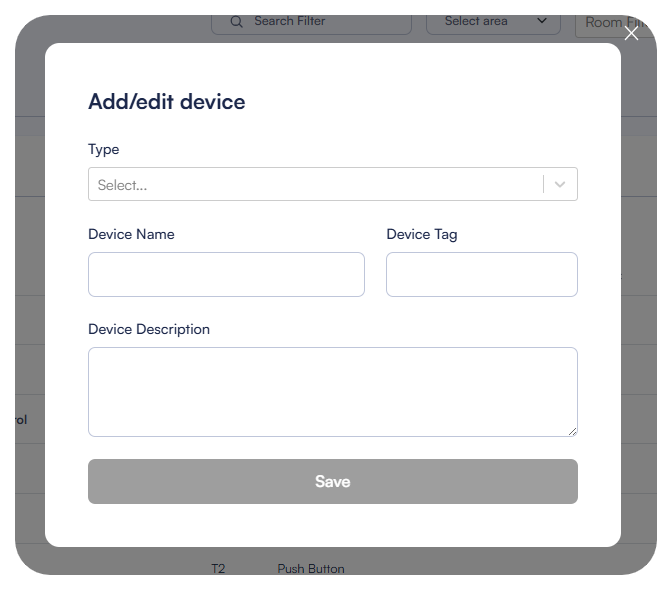
  • A dialog box will appear for adding a new device
Select Device Type: #
  • In the Add/edit device dialog, choose a device type from the dropdown menu
  • The available types include both predefined and custom device types
  • The selected type determines the device’s properties and required actuator channels


Complete Device Information: #
  • Device Name: Enter a descriptive name (e.g., “Light 1”)
  • Device Tag: This field can be filled automatically when linked to an actuator or can be manually entered
  • Device Description: Add optional details about this specific device
Save the New Device: #
  • Click “Save” to add the device to the room
  • The device will appear in the devices list for the selected room


Managing Device Properties #

Once devices are added to rooms, you can manage their properties and configurations:

View Device Details:

  • The Devices List shows all devices with their properties in columns
  • Information displayed includes device name, description, tag, type, and category
  • Scene assignments are visible with toggle switches
Edit Device Properties: #
  • Click the pencil icon in the Action column to edit a device
  • The Add/edit device dialog will open with the current device information
  • Modify any fields as needed and click “Save” to update the device
Delete Devices: #
  • Click the trash icon in the Action column to remove a device
  • Confirm the deletion when prompted
  • Note that deleting a device will remove all its configurations and links to actuators
Filter and Search: #
  • Use the search field to find specific devices by name or tag
  • Use the area selector to filter devices by area
  • Use the room selector to filter devices by room

Working with Device Tags #

Device tags in ElauPro serve as unique identifiers for each device and are crucial for KNX integration:

Understanding Device Tags: #
  • Tags are used to identify devices in the KNX system
  • They appear in group addresses and in the actuator channels descriptions
  • Tags can be generated automatically or assigned manually
  • Tags are very useful to filter lists and quickly find a device or an address
Automatic Tag Generation: #
  • When a project is configured with automatic tag generation, tags follow the defined pattern
  • Tags typically include a device type code, and a sequential number
  • Example: “L1” might represent “Living Room Light 1”
Manual Tag Assignment: #
  • Enter a custom tag in the Device Tag field when adding or editing a device
  • Ensure tags are unique across your project to avoid conflicts
  • Consider using a consistent naming convention for easier management
Tag Usage: #
  • Tags appear in the ElauPro interface, reports, and exports
  • Tags are used in the KNX group address structure and actuators channels
  • Electricians may refer to tags in the electrical schematics
Editing Tags: #
  • Tags can be modified by editing the device
  • If you change a tag after KNX configuration, you may need to update your ETS project accordingly
What are your feelings