Search
Close this search box.
Search
Close this search box.

Visualization Interface

Accessing the Interface #

After configuring the HyperVisu server and downloading your application from ElauPro, you can access the visualization interface through two primary methods: the web application or the mobile application. Both provide similar functionality with interfaces optimized for their respective platforms.


Web Application #

The web application allows you to access your HyperVisu visualization directly through a web browser, without installing additional software.

To access the web application:

    • Open a web browser on any device connected to the same local network as your HyperVisu server
    • Enter the IP address of your HyperVisu server in the address bar (e.g., 192.168.1.60)
    • You will arrive at the HyperVisu landing page, which presents two options:
      • Administration: Takes you to the server administration interface
      • HyperVisu: Opens the web visualization interface
    • Click on the HyperVisu button to access the visualization interface
    • You will be prompted to log in with your user credentials


Mobile Application #

The mobile application provides a native experience optimized for smartphones and tablets, with offline capabilities and push notifications.

To access the mobile application:

  • Download and install the HyperVisu application from:
    • Google Play Store (for Android devices)
    • Apple App Store (for iOS devices)
  • Launch the application on your device
  • On first launch, you will need to configure your connection to the HyperVisu server
  • After configuration, you will be prompted to log in with your user credentials

Connection Setup #

Before you can use the visualization interface, you need to establish a connection to your HyperVisu server and authenticate your user account.

IP Address Configuration #

First-time connection:

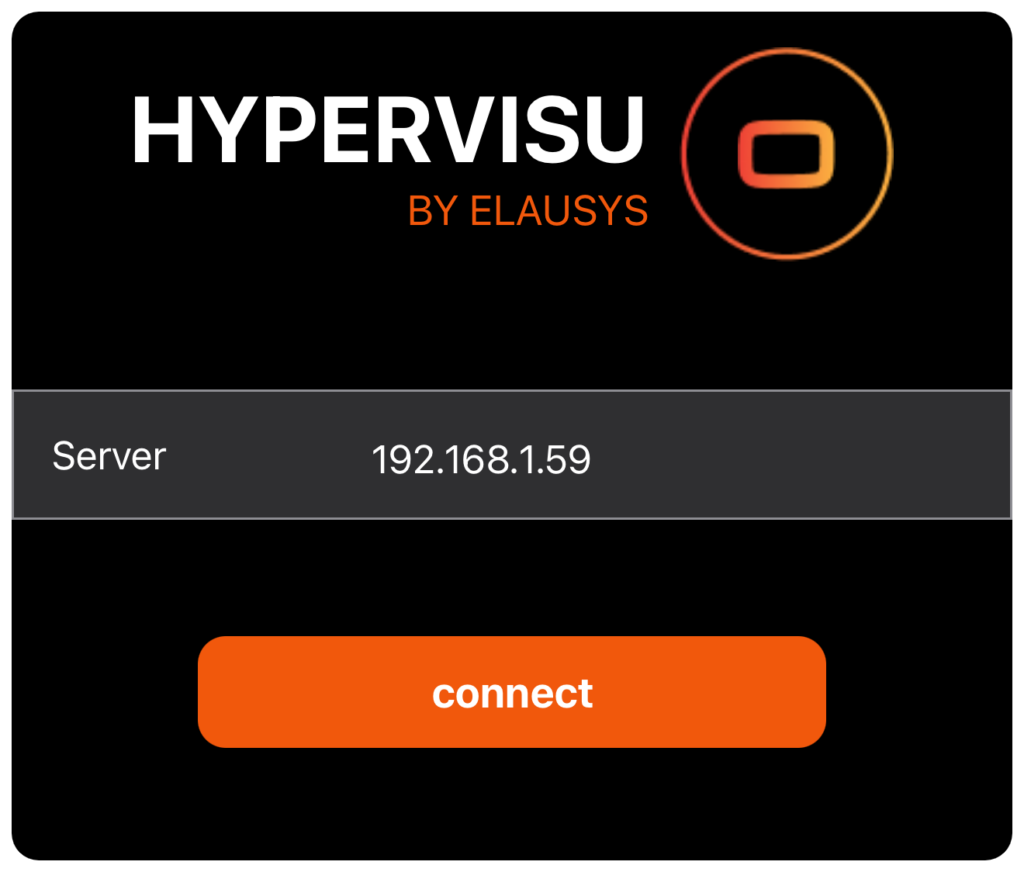
When opening the mobile application for the first time, you’ll need to configure the server connection:

  • The connection screen will be displayed automatically
  • Enter the IP address of your HyperVisu server in the field provided
    • By default, the HyperVisu server is configured with the static IP address 192.168.1.60
    • If your server has a different IP address, enter it here


Tap the Connect button to establish the connection

Connection options:

The mobile application attempts to connect in the following order:

  • First, it tries to connect to the stored local IP address (if previously configured)
  • If that fails, it attempts to connect through the Elausys cloud server using the server’s serial number
  • If both connection methods fail, the connection page is displayed to manually enter the server IP


User Authentication #

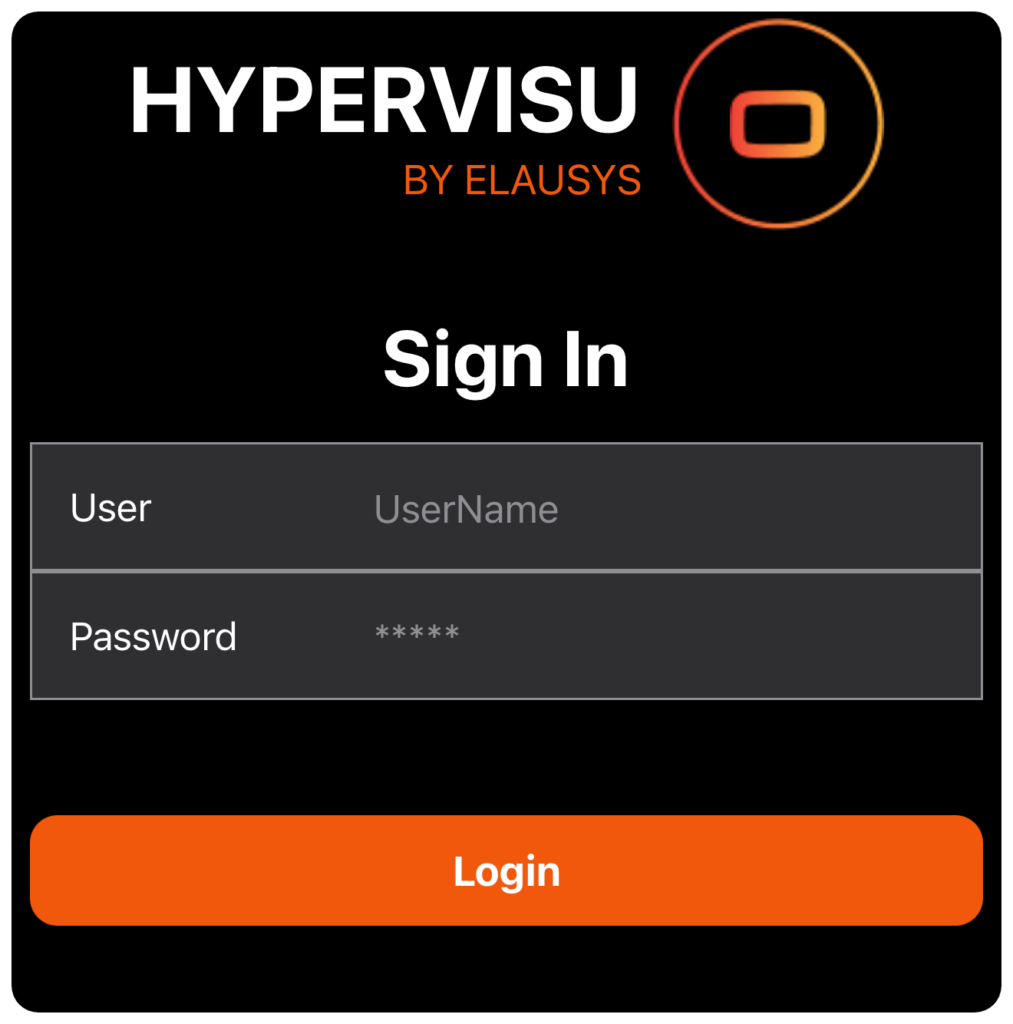
Once connected to the HyperVisu server, you’ll need to authenticate your user account to access the visualization interface.

Logging in:

  • After establishing a connection to the server, the login screen will appear
  • Enter your username in the “User” field
  • Enter your password in the “Password” field
  • Tap the “Login” button to authenticate
 

Authentication notes:

  • User authentication is encrypted for security
  • User accounts are managed through the ElauPro application, not directly on the HyperVisu server
  • Each user can have personalized settings, including language preferences, and access restrictions
  • The application will store your login credentials locally to allow automatic login on subsequent launches


After successful login:

  • The application will retrieve your personal configuration from the server
  • The interface will be customized according to your user settings (access permissions, favorites)
  • You’ll be directed to the home page with access to all rooms and categories permitted by your access level


Important security notes:

  • Different access levels can be configured for different users through ElauPro
  • If using multiple devices to access the same HyperVisu installation, consider using different user accounts on each device to receive notifications on all devices
 

Application Layout #

After successfully connecting and logging in to your HyperVisu system, you’ll be presented with an intuitive interface designed to help you efficiently control and monitor your smart building. The application is organized into several key screens, each with a specific purpose and set of features.


Home Page #

The Home page serves as the central dashboard for your HyperVisu system, providing quick access to the most important controls and information.
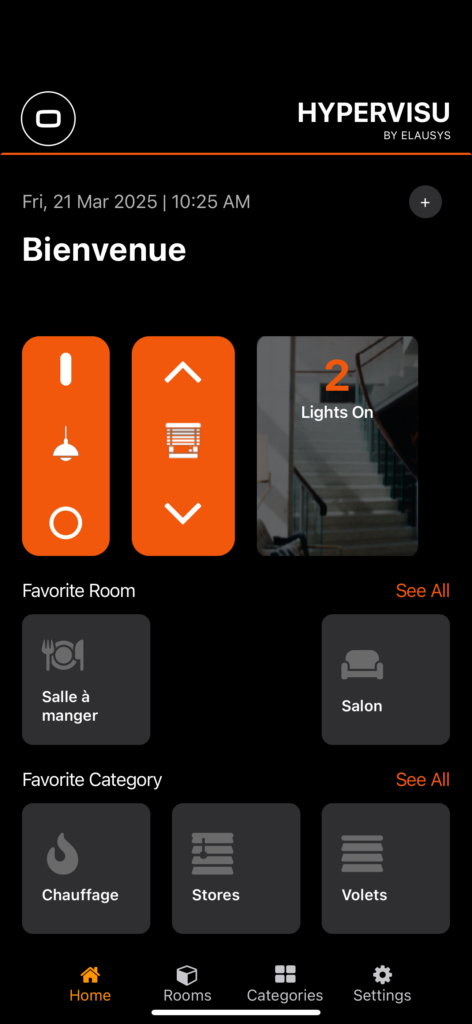
Home Page Elements:

  • Header: Displays the HyperVisu logo, current date and time, and a “+” button in the top-right corner for managing scenarios
  • Welcome Message: Personalized greeting (e.g., “Bienvenue” or other languages based on your settings) is set in the user profile in ElauPro using the App title field :
  • Global Controls: Large buttons for controlling all lights and shutters/blinds in the building:
    • Light controls: Turn all lights on or off with a single tap
    • Shutter/blind controls: Raise or lower all shutters/blinds throughout the building
  • Active Lights Indicator: Shows the number of lights currently active in the building (e.g., “2 Lights On”)
    • Tapping this indicator will display a list of all active lights, allowing you to turn them off directly
  • Favorite Rooms Section: Displays rooms you’ve marked as favorites for quick access
    • Each room is represented by its icon and name
    • A “See All” link takes you to the complete Rooms page
  • Favorite Categories Section: Shows categories of devices you’ve marked as favorites
    • Each category is represented by its icon and name (e.g., Chauffage, Stores, Volets)
    • A “See All” link takes you to the complete Categories page
  • Favorites Scenarios: If you’ve created and marked scenarios as favorites, they’ll appear for quick access

The Home page is designed to provide at-a-glance information about your building’s current state and offer immediate access to the most commonly used controls and rooms.


Navigation Structure #

HyperVisu uses a straightforward navigation system with four main sections, accessible via the navigation bar at the bottom of the screen.

Navigation Bar:

  • Home: Returns to the main Home page (highlighted in orange when active)
  • Rooms: Displays the list of all rooms in your building
  • Categories: Shows all device categories available in your system
  • Settings: Provides access to application settings and configuration options

The navigation bar is always visible, allowing you to quickly switch between these main sections of the application regardless of where you are in the interface. The currently active section is highlighted in orange to help you keep track of your location.

Additional Navigation Elements:

  • The “+” button in the top-right corner of the Home page allows you to edit or create new scenarios
  • “See All” links take you to complete lists from shortened favorites sections
  • Room and category tiles serve as navigation links to their respective detailed pages


Rooms and Categories Views #

HyperVisu offers two primary ways to access and control your devices: by room location or by device category. This dual approach gives you flexibility in how you interact with your smart building.
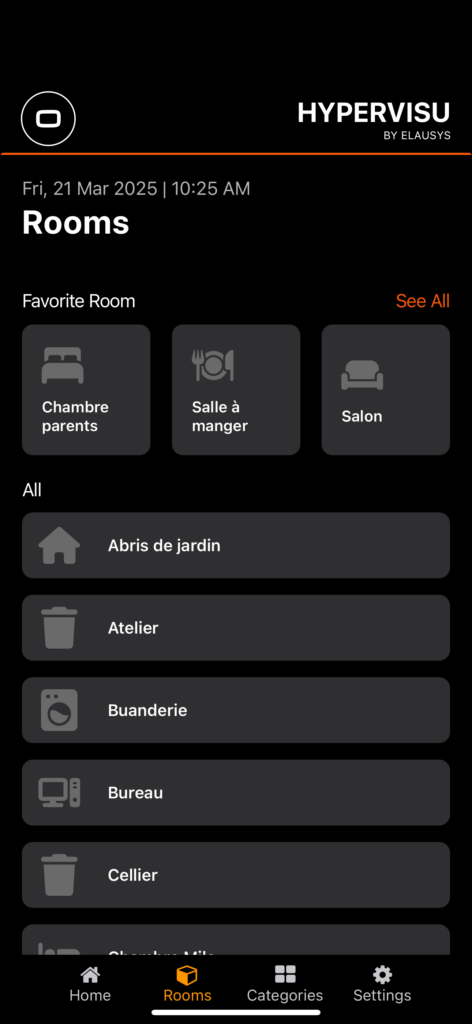
Rooms View:

The Rooms page displays all rooms in your building, organized in the following structure:

  • Favorite Rooms: Rooms you’ve marked as favorites appear at the top for quick access
    • Each room is represented by a tile with its icon and name
    • A “See All” link shows all favorites if you have many
  • All Rooms: Below the favorites, you’ll find a complete alphabetical list of all rooms
    • Each room is represented by a tile with its icon and name
    • Rooms are displayed based on your user access level permissions

When you select a specific room, you’ll see:

  • Global room controls for lights and shutters (if enabled in ElauPro)
  • The number of active light points in the room
  • All available devices in the room, organized by category
  • Favorite devices in the room are displayed first


Categories View:

The Categories page organizes devices by their function rather than location:

  • Favorite Categories: Categories you’ve marked as favorites appear at the top
    • Each category is represented by a tile with its icon and name (e.g., Chauffage, Stores, Volets)
    • A “See All” link shows all favorites if you have many
  • All Categories: Below the favorites, you’ll find a complete alphabetical list of all device categories
    • Common categories include Éclairage (Lighting), Chauffage (Heating), Volets (Shutters), and more
    • Categories are displayed based on your user access level permissions
 

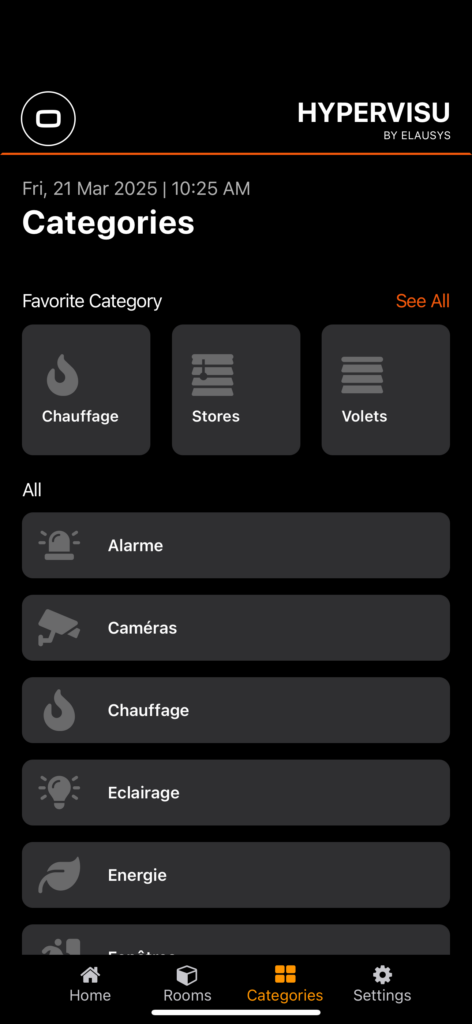
When you select a specific category, you’ll see:

  • Global category controls (if applicable and enabled in ElauPro)
  • All devices of that category, organized by room
  • Favorite devices in that category are displayed first


This dual navigation structure allows you to quickly find and control devices based on either their physical location or their function, depending on what’s most convenient for your current needs.

Managing Favorites #

HyperVisu allows you to personalize your experience by marking frequently used elements as favorites, making them readily accessible from the Home page and at the top of their respective sections. You can set favorites for rooms, categories, individual devices (widgets), and scenarios.

Setting Favorites #

To set a room as a favorite:

  • Navigate to the Rooms page using the bottom navigation bar
  • Long-press on the room tile you want to mark as a favorite
  • A confirmation message will appear briefly to indicate the room has been added to favorites
  • The room will now appear in the Favorite Rooms section on the Home page


To set a category as a favorite:

  • Navigate to the Categories page using the bottom navigation bar
  • Long-press on the category tile you want to mark as a favorite
  • A confirmation message will appear briefly to indicate the category has been added to favorites
  • The category will now appear in the Favorite Categories section on the Home page


To set a device (widget) as a favorite:

  • Navigate to the room or category containing the device
  • Long-press on the device widget you want to mark as a favorite
  • A confirmation message will appear briefly to indicate the widget has been added to favorites
  • The widget will now appear at the top of its room or category page


To set a scenario as a favorite:

  • Create a new scenario or access an existing one by tapping the “+” button on the Home page
  • In the scenario configuration screen, toggle the “Add to favorites” option to ON
  • Save your changes
  • The scenario will now appear on the Home page for quick access


Removing Favorites #

The process for removing favorites is similar to setting them:

To remove a room, category, or widget from favorites:

  • Navigate to the element you want to remove from favorites
  • Long-press on the tile or widget
  • A confirmation message will appear briefly to indicate the item has been removed from favorites
  • The item will no longer appear in the respective Favorites section


To remove a scenario from favorites:

  • Access the scenario by tapping its tile on the Home page or through the Scenarios section
  • In the scenario configuration screen, toggle the “Add to favorites” option to OFF
  • Save your changes


The scenario will be removed from the Home page

Global Commands #

HyperVisu provides global command features that allow you to control multiple devices of the same type simultaneously. These commands are available at three levels: building-wide (from the Home page), room-specific (from individual room pages), and category-specific (from category pages).

Lighting Controls #

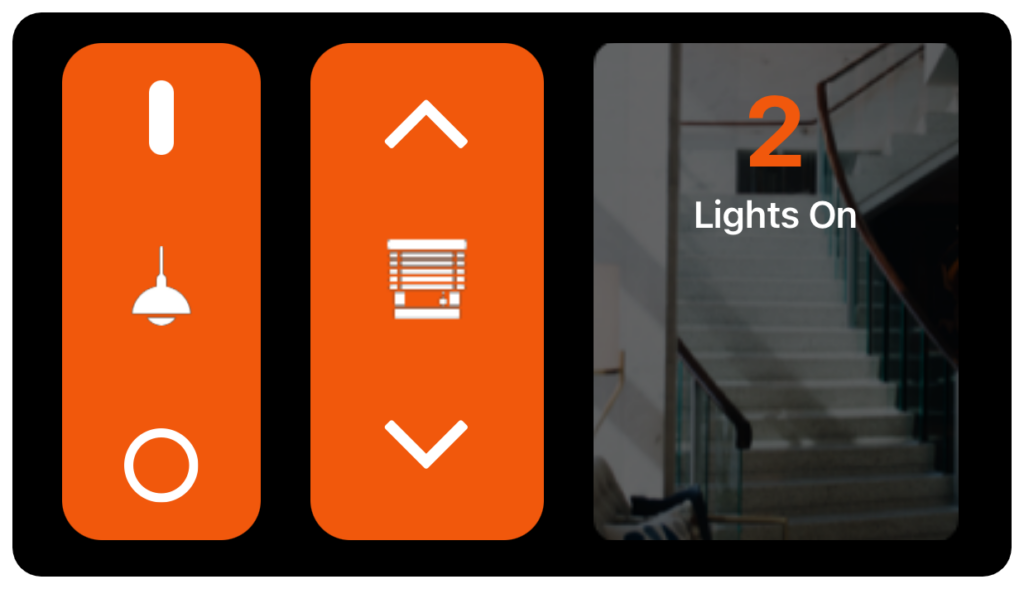
The global lighting controls allow you to manage all lights in a defined area (building, room, or category) at once.

Home Page Lighting Controls:

From the Home page, you’ll find a large orange control button for building-wide lighting control:

  • The button displays a light bulb icon
  • Pressing the button activates a toggle function to turn all lights on or off throughout the building
  • When pressed, the system sends commands to all light switches and dimmers in the building


Room Lighting Controls:

When viewing an individual room, you’ll see a similar lighting control that affects only the lights in that room:

  • The control appears as an orange button with a light bulb icon
  • Pressing this button toggles all lights in the current room on or off


Category Lighting Controls:

In the category view, you’ll find global controls that affect all lighting devices:

  • The same orange button with a light bulb icon appears
  • This control toggles all lights across the building that belong to the lighting category
  • Useful for quickly managing all lighting without affecting other device types


Note: Global lighting controls only affect devices configured as “light switches” or “dimmers” in ElauPro. Devices configured as generic “switches” (typically used for power outlets) are not affected by global lighting commands, even if they control light fixtures.


Shutter/Blind Controls #

Global shutter and blind controls provide a convenient way to manage all window coverings simultaneously.

Home Page Shutter Controls:

On the Home page, a large orange button for building-wide shutter/blind control is available:

  • The button displays a shutter/blind icon
  • Three control sections are provided:
    • Up arrow: Raises all shutters/blinds throughout the building
    • Stop button (middle): Stops all shutter/blind movement
    • Down arrow: Lowers all shutters/blinds throughout the building


Room Shutter Controls:

When viewing a room, similar shutter controls affect only the shutters/blinds in that room:

  • The controls appear as an orange button with up/stop/down options
  • These controls only affect shutters and blinds in the current room


Category Shutter Controls:

In the category views, global controls affect all devices of that category:

  • The same orange button with up/stop/down controls appears


Note: Global shutter/blind controls can be enabled or disabled for each room and category in ElauPro. If you don’t see these controls in a particular room, they may not have been enabled during configuration.


Temperature Information #

HyperVisu displays temperature information at both the room levels to help you monitor climate conditions throughout your space.

Room Temperature Display:

When viewing a room with a climate widget present in the room, you’ll see:

  • The current temperature displayed prominently (e.g., “20.8°”)
  • This temperature reading comes from the primary temperature sensor in the room linked to the climate widget


Active Lighting Management #

HyperVisu provides a special feature for monitoring and managing active lights throughout your building, helping you identify and control lights that may have been left on unnecessarily.

Active Lights Indicator:

On the Home page and in room views, you’ll find an active lights indicator:

  • Home page: Shows the total number of lights currently on in the entire building (e.g., “2 Lights On”)
  • Room view: Shows the number of lights currently on in that specific room (e.g., “1 Lights On”)


Accessing Active Lights Details:

To view and manage the active lights:

  • Tap on the active lights indicator (the tile showing the number of lights on)
  • A new screen appears titled “Lights On” showing all currently active lights
  • Lights are organized by room for easy identification
  • Each light shows its location (room) and name


Controlling Active Lights:

From the Lights On screen, you can:

  • See at a glance which lights are currently active throughout your building
  • Toggle individual lights off by tapping their switch
  • This feature is particularly useful when leaving the house or going to bed, as it allows you to quickly identify and turn off any lights that were accidentally left on
What are your feelings