
In case of troubles to establish the communication, the serial module PRT3 has two LEDs that indicate the status of the serial communication. The RX LED blinks each time a telegram is received by the PRT3 module. The TX LED blinks each time a telegram is sent by the PRT3 module. See picture below.
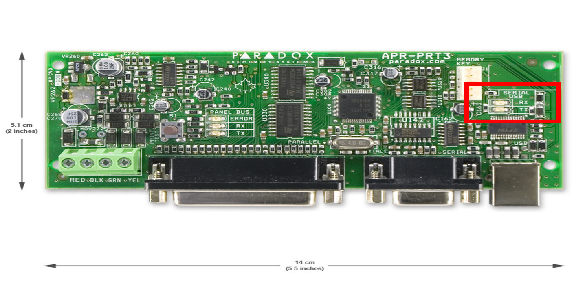
These LEDs can be used to see if the PRT3 module correctly sends status to the EVO-KNX.
When zone reporting is configured, opening or closing a zone should make the TX LED blink once. If this is not the case, the PRT3 configuration is not correct. Verify that all required settings are done according to Alarm system setup.
If the LEDs blink but no telegram is received on the KNX side, verify that the serial cable is properly fit on both cards and that the 12VDC is present on the input terminals. Verify that the ETS application program is loaded in the EVO-KNX gateway and that group addresses are assigned to the required objects. Download the application program and read the firmware version of the EVO-KNX module using the dedicated object.
IMPORTANT: If no communication can be established, double check the PRT3 settings using the alarm system keypad, it occurs that the settings are not always properly written into the PRT3 module using Babyware software. In that case, settings the parameters from the keypad will solve the problem.
PRT3 keypad verification
Programming sections from the keypad
To access the Printer Module’s programming mode:
STEP 1: Press and hold the [0] key.
STEP 2: Enter the [INSTALLER CODE].
STEP 3: Enter section [4003] (EVO).
STEP 4: Enter the Printer Module’s 8-digit [SERIAL NUMBER].
STEP 5: Enter the 3-digit [SECTION] you want to program.
STEP 6: Enter the required data.
Section 016 for the communication options.
Option 1 : ON
Option 2 : ON
Option 3 : OFF
Option 4 : ON
Option 5 : OFF
Option 6 : OFF