
After the first administrator is created, the setup wizard walks you through commissioning: what kind of project, where it is, how it reaches the KNX bus, which services run, and what the building contains. You can also re-run it later from the System page.
How the wizard works
- Nothing is written to the server until the final apply. Every earlier step only stages a draft.
- The draft survives reloads — you can close the browser and come back; your answers are still there.
- Skip setup — configure later and Save & exit are always available in the header. Both leave the wizard and land on the System page; Save & exit keeps the draft for later.
- Navigate with Back and Continue. The header shows your progress ("Step 2 of 7" — the ETS route has one extra step, so it counts to 8).
Step 1 — Setup mode
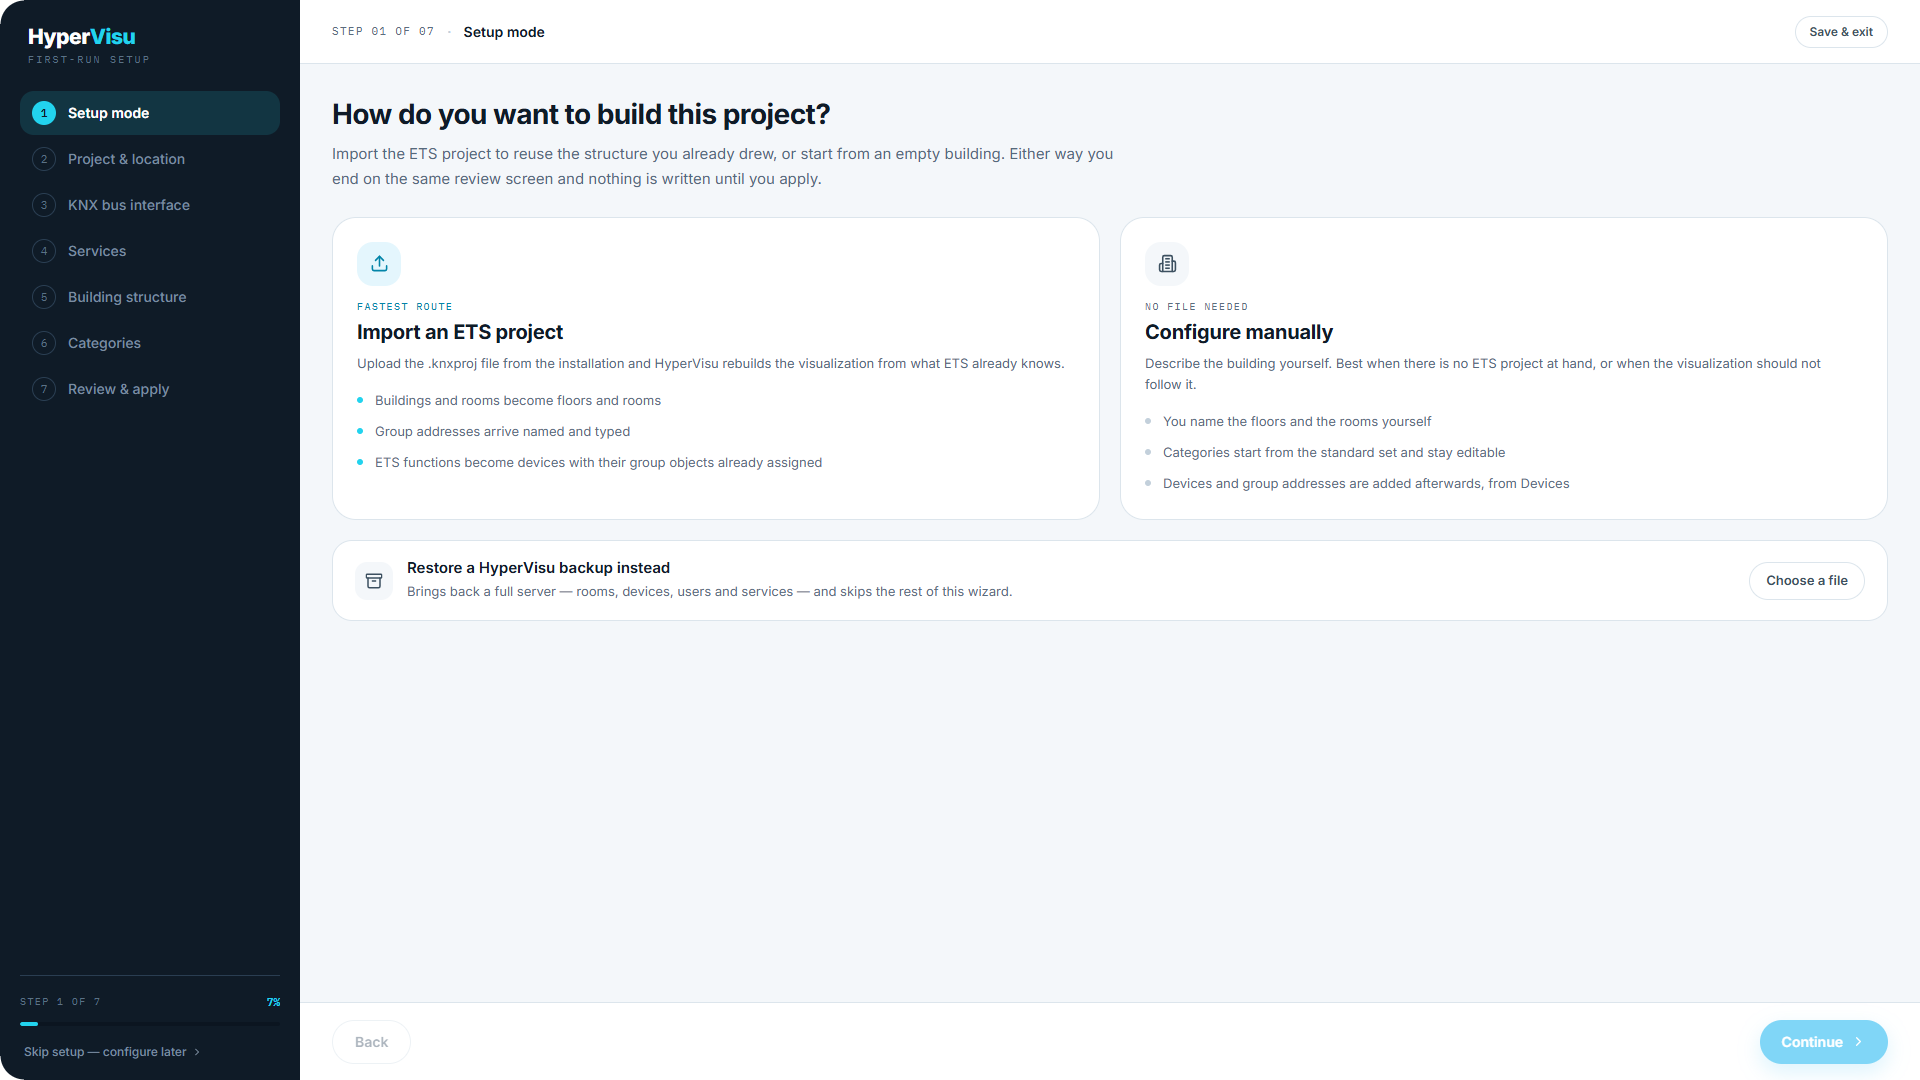
"How do you want to build this project?" Three choices:
- Import an ETS project (Fastest route) — upload the
.knxprojfile from the installation and HyperVisu rebuilds the visualization from what ETS already knows: buildings and rooms become floors and rooms, group addresses arrive named and typed, ETS functions become devices with their group objects already assigned. - Configure manually (No file needed) — describe the building yourself. Best when there is no ETS project at hand, or when the visualization should not follow it.
- Restore a HyperVisu backup instead — Choose a file to bring back a full server (rooms, devices, users and services) and skip the rest of the wizard.
📘 Note: You can change your mind later — switching mode sends you back to step 4, because the two screens after it belong to the other route. What you entered on the abandoned route is kept in case you switch back.
Step 2 — Project & location
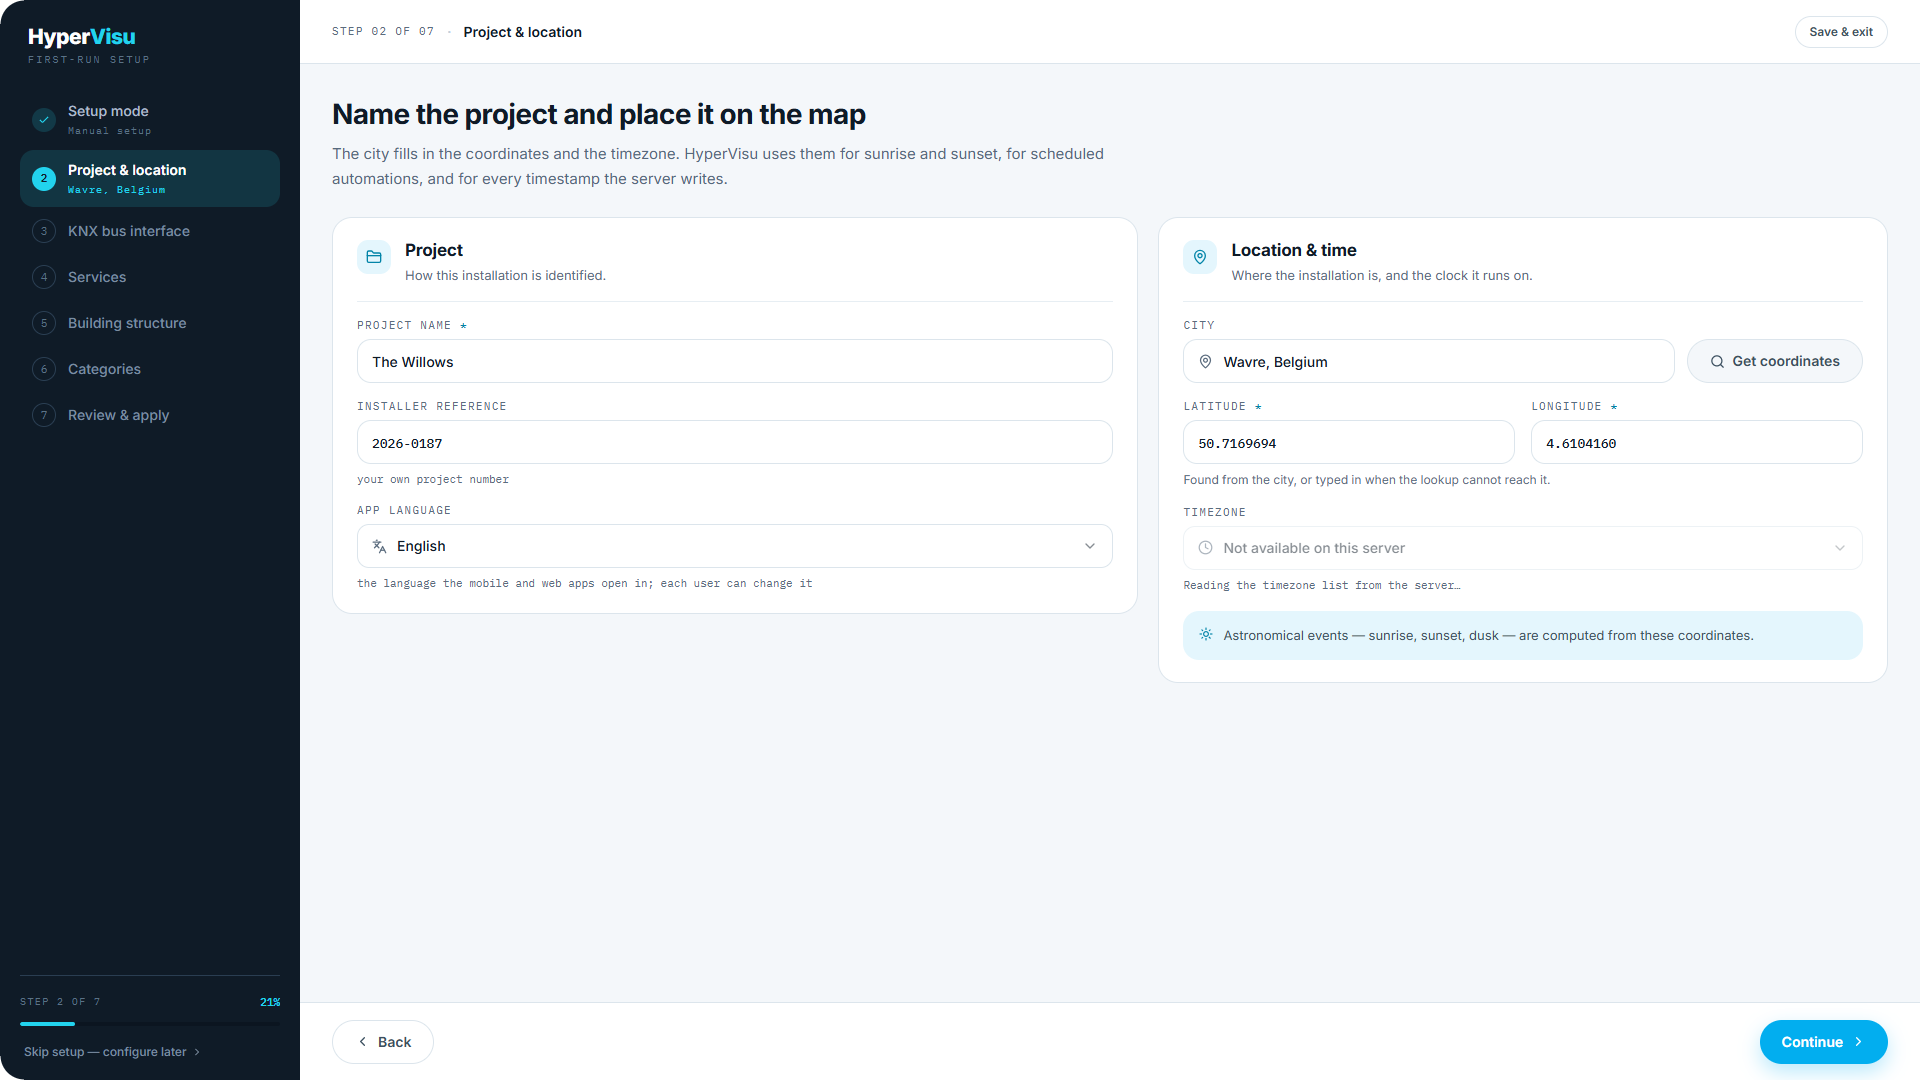
"Name the project and place it on the map."
| Field | Purpose |
|---|---|
| Project name | How this installation is identified |
| Installer reference | Your own project number |
| App language | The language the mobile and web apps open in; each user can change it |
| City → Get coordinates | Type the city and let the server look up latitude and longitude |
| Latitude / Longitude | Filled by the lookup, or typed in by hand |
| Timezone | The clock the server runs on |
Coordinates and timezone drive sunrise and sunset times, scheduled automations, and every timestamp the server writes — set them accurately.
Step 3 — KNX bus interface
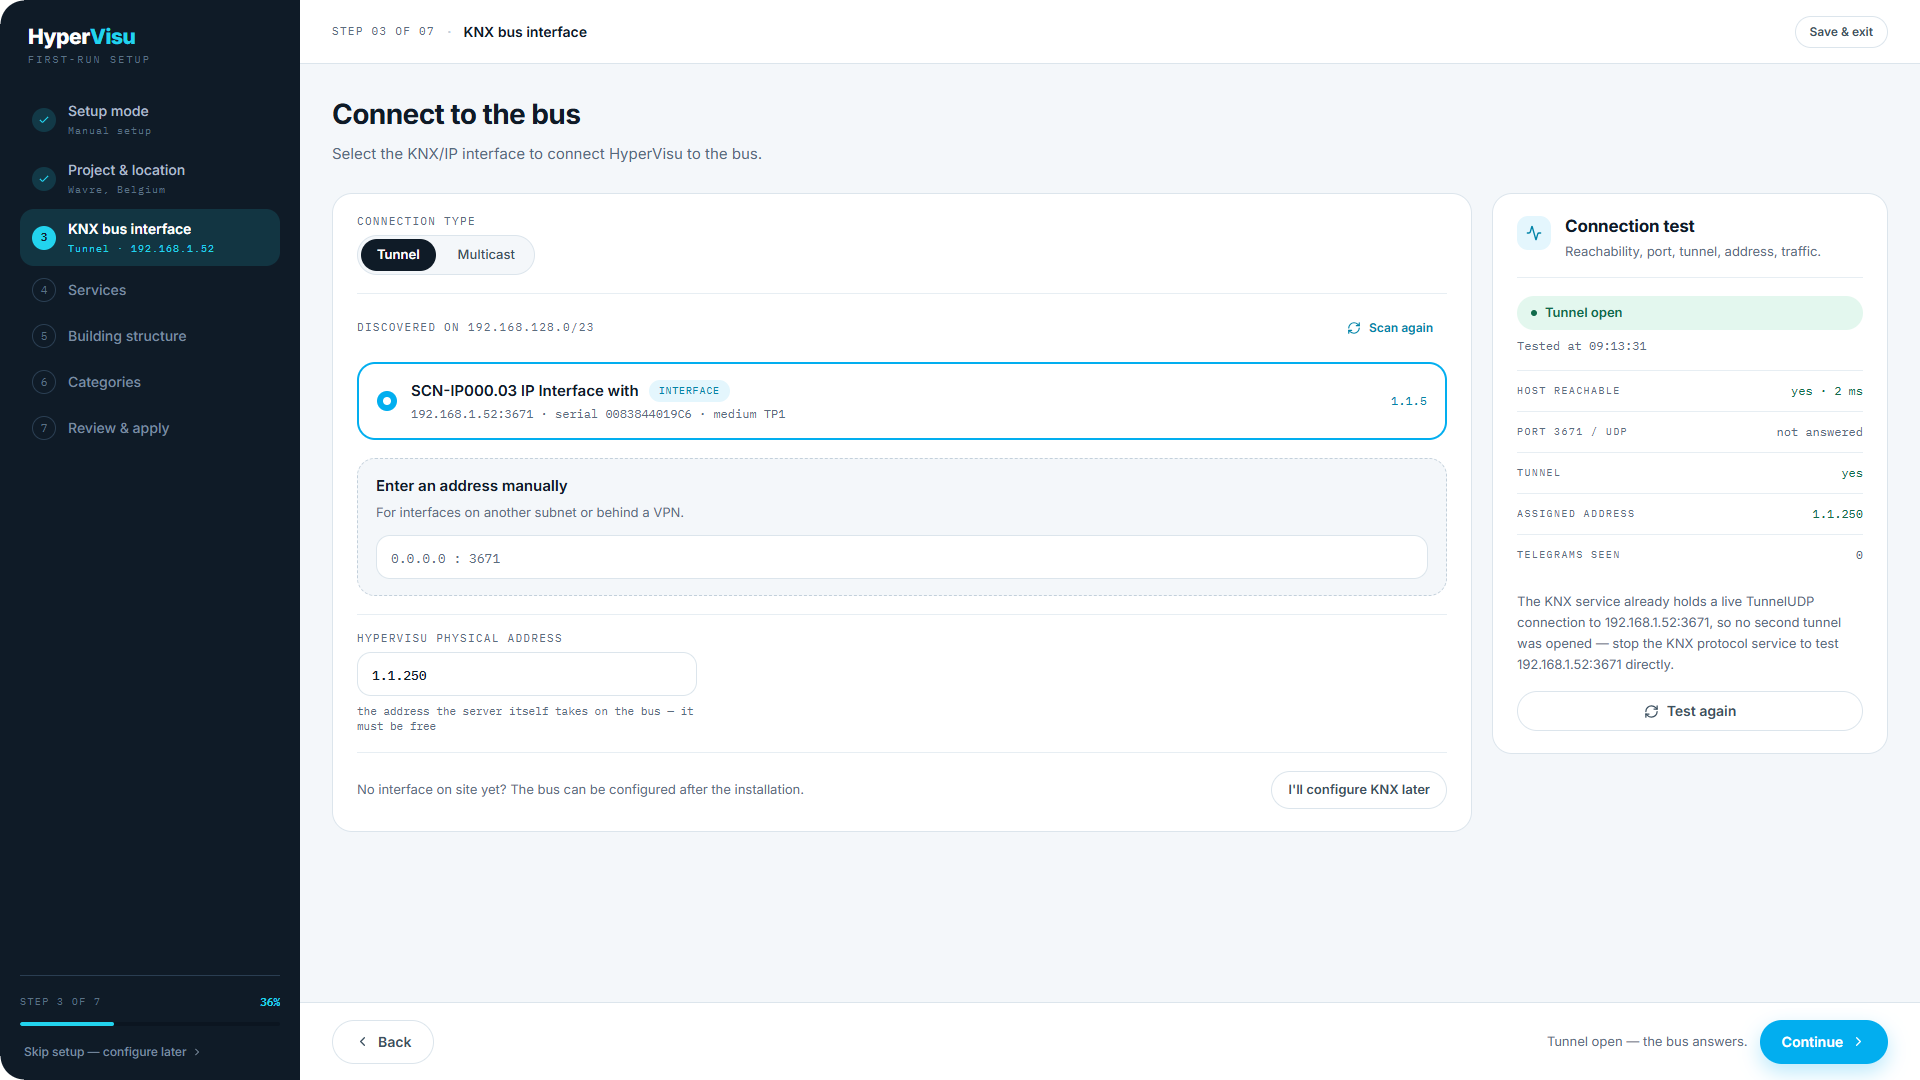
"Connect to the bus." The wizard scans the network for KNX/IP interfaces and lists what answered as cards showing the interface name, type (Interface or Router) and serial. Click Scan again to repeat the discovery.
If nothing answers, or the interface is on another subnet or behind a VPN, use Enter an address manually: interface IP and port (default 3671).
Also set:
- Connection type — Tunnel (UDP, for a KNX/IP interface) or Multicast (for a KNX/IP router). Discovered entries pre-select the right one.
- HyperVisu physical address — the individual address the server itself takes on the bus. It must be free.
The connection test. Click Run connection test to see how far the connection gets, through four staged checks:
- Host reachable
- Port 3671 / UDP
- Tunnel
- Assigned address
A fully green ladder ends with "Tunnel open — the bus answers."
If the test fails, the wizard suggests three things to check: tunnelling enabled on the interface, no other ETS client holding every channel, and the server and interface on the same VLAN.
No bus on site yet? Click I'll configure KNX later. The wizard applies without a bus connection — rooms, devices and services are created normally, and anything bound to KNX stays silent until an interface is set in Connections (see “Connections”).
Step 4 — Services
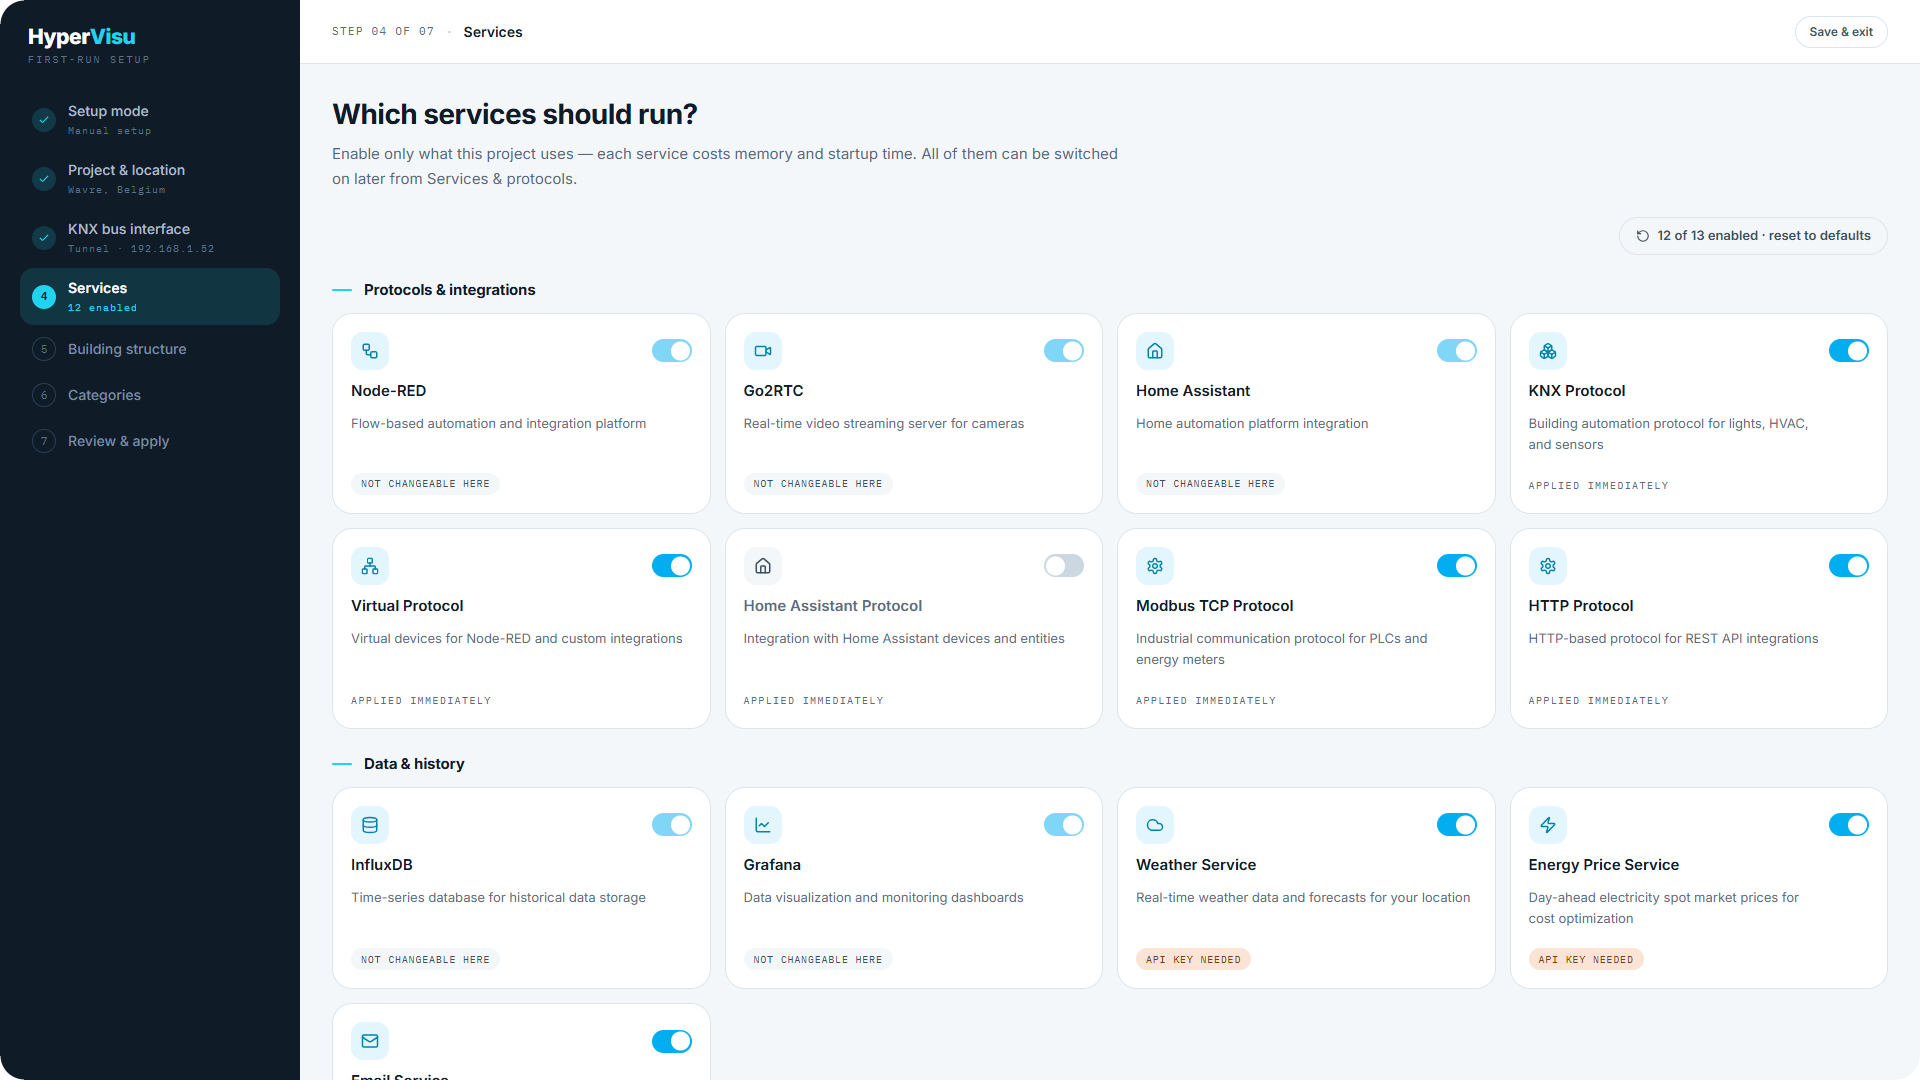
"Which services should run?" A toggle grid in two groups — Protocols & integrations and Data & history. Defaults on: KNX, Virtual, and InfluxDB (the history database).
Each toggle carries a badge telling you what enabling costs:
- restart required — the service starts on the next server restart.
- applied immediately — no restart needed.
- API key needed — the service also needs a key or credentials; configure it on the Services page after the wizard (see “Services & Protocols”).
Enable only what this project uses — each service costs memory and startup time. Everything can be switched on later from Services & protocols.
Manual branch — Building structure
(Steps 5–6 depend on the setup mode. This screen and the next appear on the manual route.)
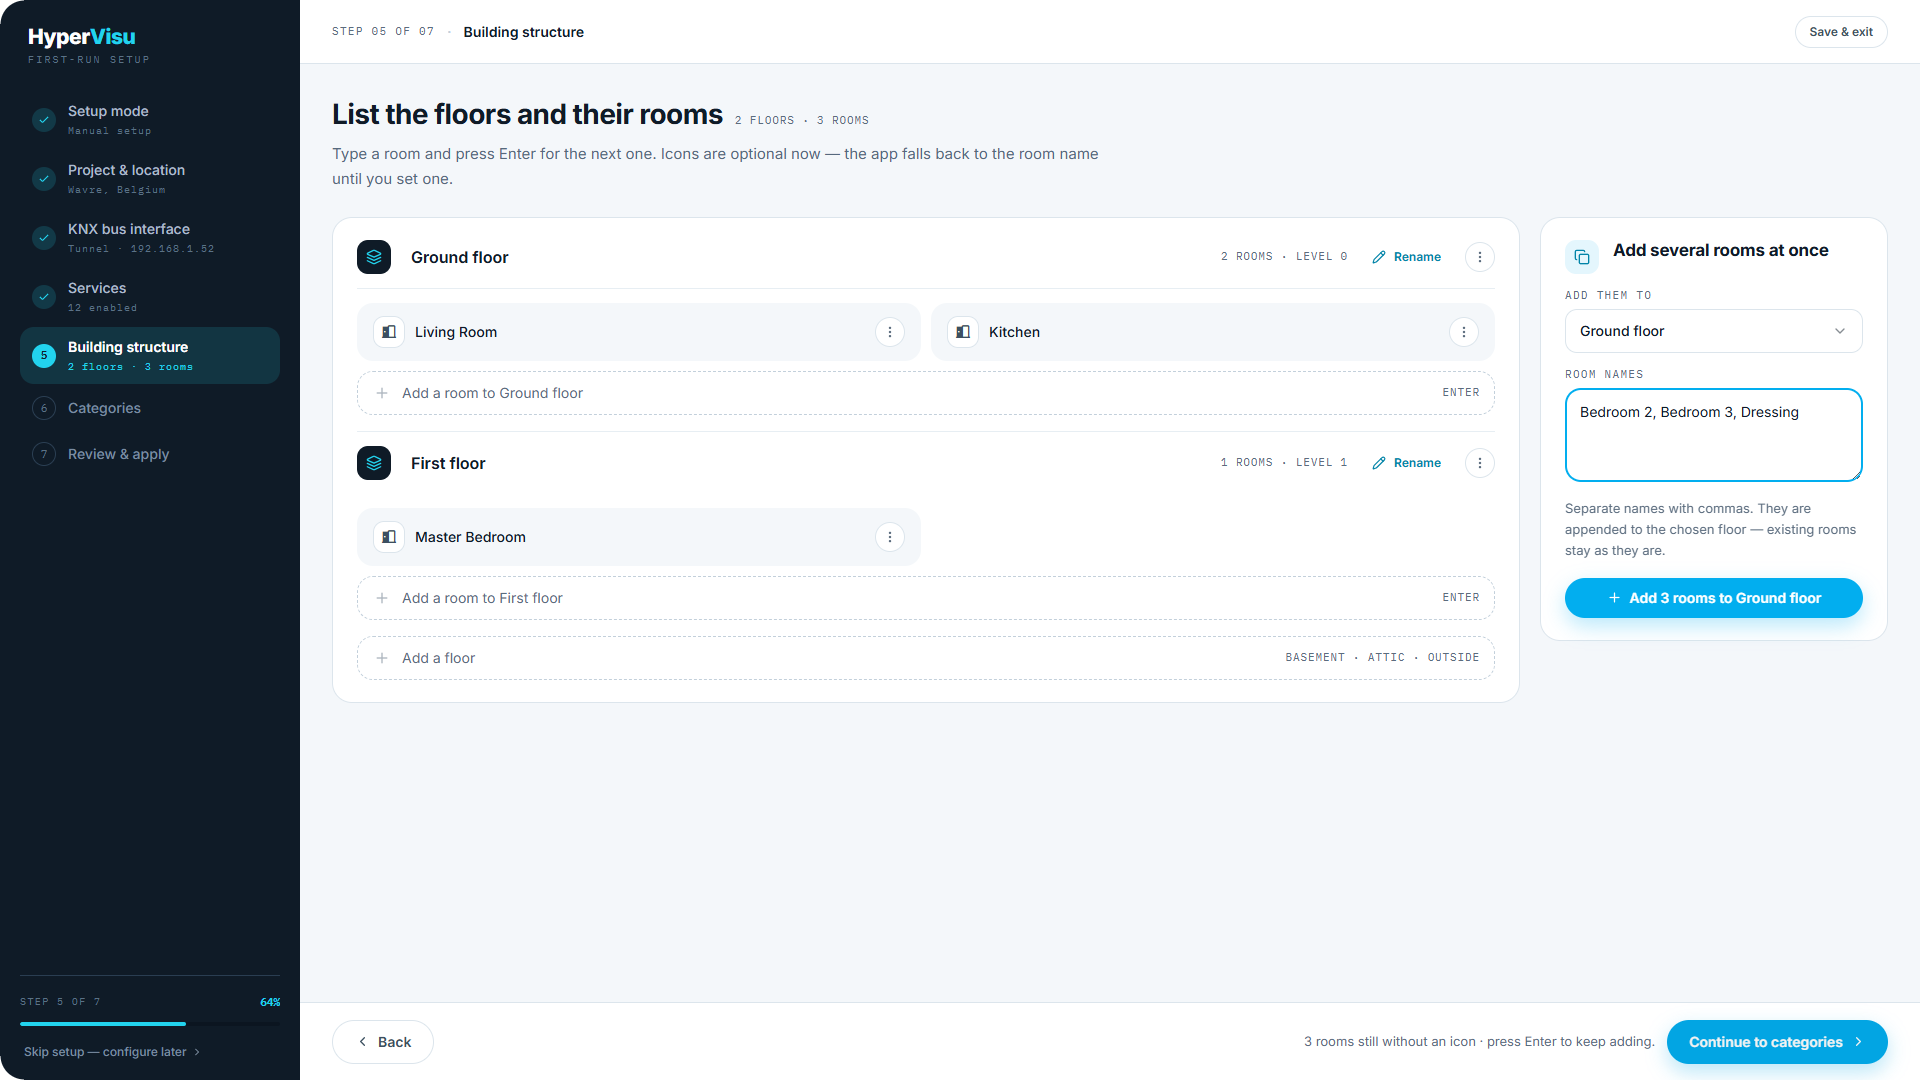
"List the floors and their rooms."
- The wizard starts with a Ground floor (level 0). Click Add a floor for more — basements take negative level numbers, upper floors positive ones.
- Type a room name and press Enter to add the next one — one room per line, as fast as you can type.
- To add many at once, use Add several rooms at once: pick the floor, type names separated by commas ("Bedroom 2, Bedroom 3, Dressing"), and click the add button.
- Icons are optional now — the app falls back to the room name until you set one.
Manual branch — Categories
"Decide how the app groups devices." Categories become the tiles on the app home screen and the filters in every room; a device belongs to one category and one room.
The wizard seeds seven defaults: Lighting, Shutters, Heating, Sockets, Scenes, Energy, Security.
- Click a name to rename it.
- Remove a category the project doesn't need.
- Add a category of your own (name + icon), e.g. "Home cinema".
📘 Note: The manual route creates no devices. You add them per room from the Devices page after setup (see “The Devices Workspace”).
ETS branch — Import selection
(This screen replaces this article when you chose "Import an ETS project".)
"Choose what to import."
- Drop the
.knxprojfile onto the upload zone (ETS 5 or ETS 6 project export), or Browse for it. - If the project is password-protected in ETS, enter the Project password and click Unlock and read. The password is used to read the file and is never stored.
- The wizard reads the project and offers three tickable parts, each with real counts from your file:
- Building structure — the floors and rooms the ETS project describes ("3 floors · 14 rooms").
- Group addresses — the full address table, so the bus monitor and the address picker know every address by name; typed and untyped counts are shown.
- Devices from ETS functions — each ETS function becomes one device, already bound to its group addresses.
The ETS route then shows the Categories screen with the categories the project produced — one per kind of device it describes. Rename them, change icons, or add one the project doesn't cover, exactly as in this article.
ETS branch — Review import
"Check what we found." This is the correction pass over everything the import will create, organized as a tree of floors, rooms and devices. Before applying you can:
- Rename rooms and devices that still read like ETS labels — the original ETS name stays visible ("was … in ETS"), with a Revert action.
- Change a device's widget type where the import guessed wrong — the bound addresses limit which types fit.
- Move devices to another room or category, or Exclude ones the app should not show.
- Confirm inferred datapoint types — addresses without a DPT in ETS get an inferred one marked for confirmation.
- Work the "No room found" bucket: real devices whose room could not be worked out. Move each to a room; anything left is created without one.
📘 Note: If the project declares no ETS functions, the wizard works devices out from the actuator channels instead and flags every one guessed — check rooms, names and types before continuing.
Filters ("Needs attention", "Renamed"), search, and a "Next room with an issue" shortcut help you sweep large projects quickly. You can apply with issues remaining and fix them later in Devices.
Final step — Review & apply
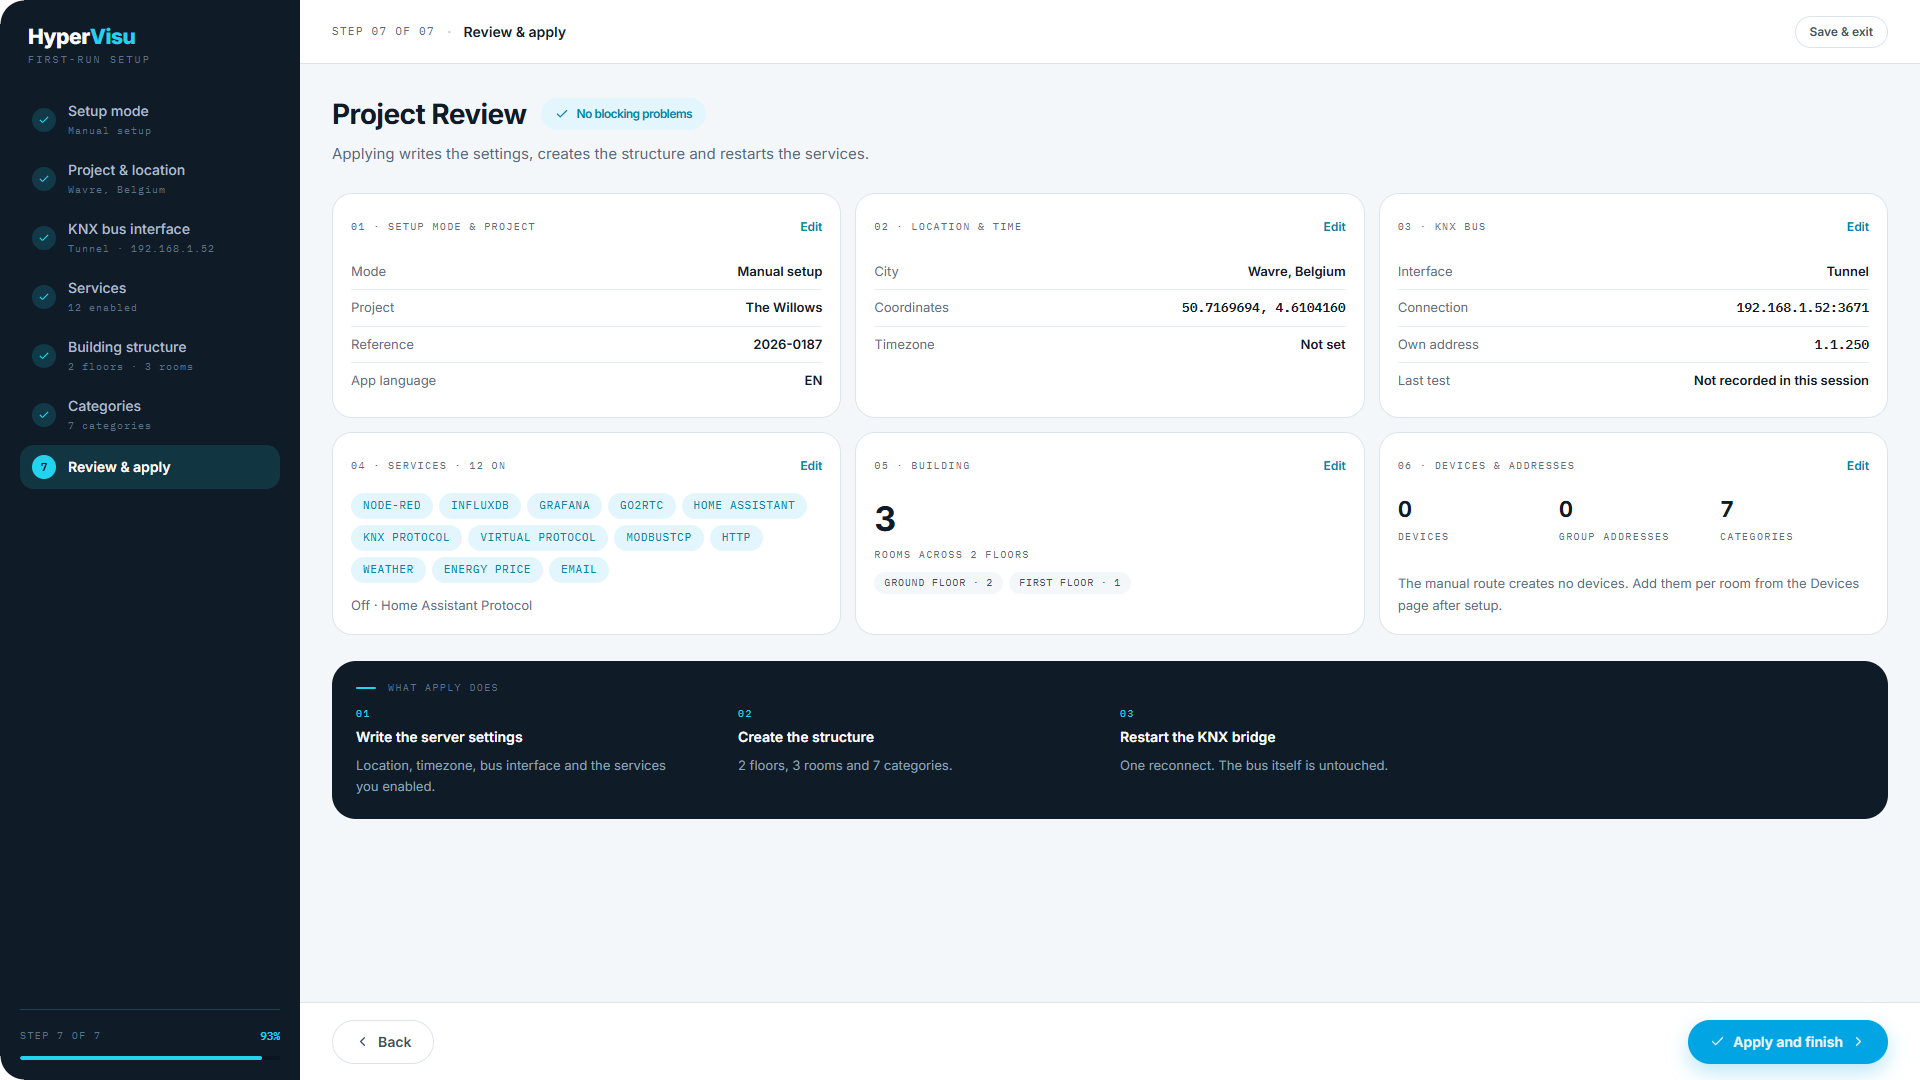
"Project Review" summarizes everything in six cards — setup mode & project, location & time, KNX bus, services, building, devices & addresses — each with an Edit link that jumps back to its step.
Blocking problems are listed above the cards (for example "No coordinates — the apply will stop on the settings stage", "No rooms — the app will open empty"). Fix them, or confirm they are intentional.
What apply does, in order:
- Write the server settings — location, timezone, bus interface and the services you enabled.
- Create the structure — floors, rooms, categories, and (on the ETS route) devices and group addresses.
- Restart the KNX bridge — one reconnect; the bus itself is untouched.
Click Apply and finish. A live progress panel follows the stages; a typical apply takes around 40 seconds and ends on the server page.
If something goes wrong: the run stops on the failing stage and tells you. What earlier stages wrote stays in place; Retry runs all stages again, so check the building on the Server page first if the failure came late. If the server restarted mid-apply, the wizard says the job was lost — check the result on the Server page and re-run the wizard if the structure is missing.