
HTTP integration
The HTTP protocol integrates devices and services that speak plain HTTP: REST APIs, cloud services with a local API, or simple network relays. It works in two directions:
- Outgoing requests — when a widget's value changes, HyperVisu sends a request (device control or webhook call).
- Polling — HyperVisu periodically requests a URL and extracts a value from the response into a widget object.
Connections. Switch on HTTP Protocol on the Services page first (see “Services & Protocols”); it is off on a new server. HTTP is multi-connection: one connection per Base URL, each with its own Poll Interval (seconds), Timeout (ms) and authentication (see “Connections”). The timeout is in milliseconds, from 1000 to 120000; left empty, a request waits 30 seconds.
Choose the Authentication Type the API requires. Changing the type empties every credential field.
| Authentication Type | What to supply | How it is sent |
|---|---|---|
| None | No credentials. | Nothing is added. |
| API Key (Header) | Header Name and API Key. | A header with that name and the key. |
| API Key (Query Parameter) | Query Parameter and API Key. | Added to the URL of every request. |
| Basic Authentication | Username and Password. | The standard Basic authorization header. |
| Bearer Token | Bearer Token. | The standard Bearer authorization header. |
| Custom Headers | One row per header, name and value; Add Header adds a row. | Every row, with every request. |
Fill in both fields of a pair: a pair with one field empty is not sent. API Key, Password and Bearer Token are masked in the editor; values typed under Custom Headers are shown in clear.
An HTTP connection has no Test button. Its status stays State unknown until a bound object has exchanged a request; Connected then means the last request was accepted, and No reply since appears after a failed one.
📘 Note: A poll interval of
0makes the connection write-only — nothing is polled, only outgoing requests are sent. A poll interval left empty also means the endpoint is never polled: type the value, the grey60is only a hint.
Binding an object. Per object you set the Path and the HTTP Method, and for polled values how to extract the reading from the response with Parse Method and Parse Path:
- JSON — a path with dot and array syntax, e.g.
data.sensors[0].temperature. A negative index such as[-1]reads the last element; filters and wildcards are not supported. - Pattern Matching — for non-JSON responses. The Parse Path must start with
PATTERN=, for examplePATTERN=Temp:\s\v. Switching the parse method empties Parse Path, so type it after you choose the method.
For outgoing requests, set HTTP Method to POST or PUT and choose the Content Type. The Request Body Template is a template in which ${value} is replaced by the value being sent, e.g. {"state": ${value}}.
📘 Note: Polling always sends a GET to the object's Path. A POST or PUT object only sends a request when its value changes.
Worked example — outdoor air quality from a local sensor API
A local air-quality monitor exposes GET http://192.168.1.140/api/current returning {"pm25": 8.4, "aqi": 35} and requires the API key in an X-Api-Key header.
- Create an HTTP connection: Base URL
http://192.168.1.140, Poll Interval (seconds)60, Timeout (ms)5000, Authentication Type API Key (Header), Header NameX-Api-Key, the key in API Key (see “Connections”). - In Devices, add an Analog Input widget "Air quality". Under Protocol, select your HTTP connection, listed by the name you gave it.
- On its value object set Path to
/api/current, leave HTTP Method on GET and Parse Method on JSON, and enteraqiin Parse Path. - Click Save object, then click Apply changes in the sidebar and confirm. The reading updates every minute; set units and decimals on the object (see “Object Settings, Logging & Notifications”).
- After the next poll, check that the connection reads Connected on the Connections page, then compare the widget with the API's actual response.
Binding HTTP
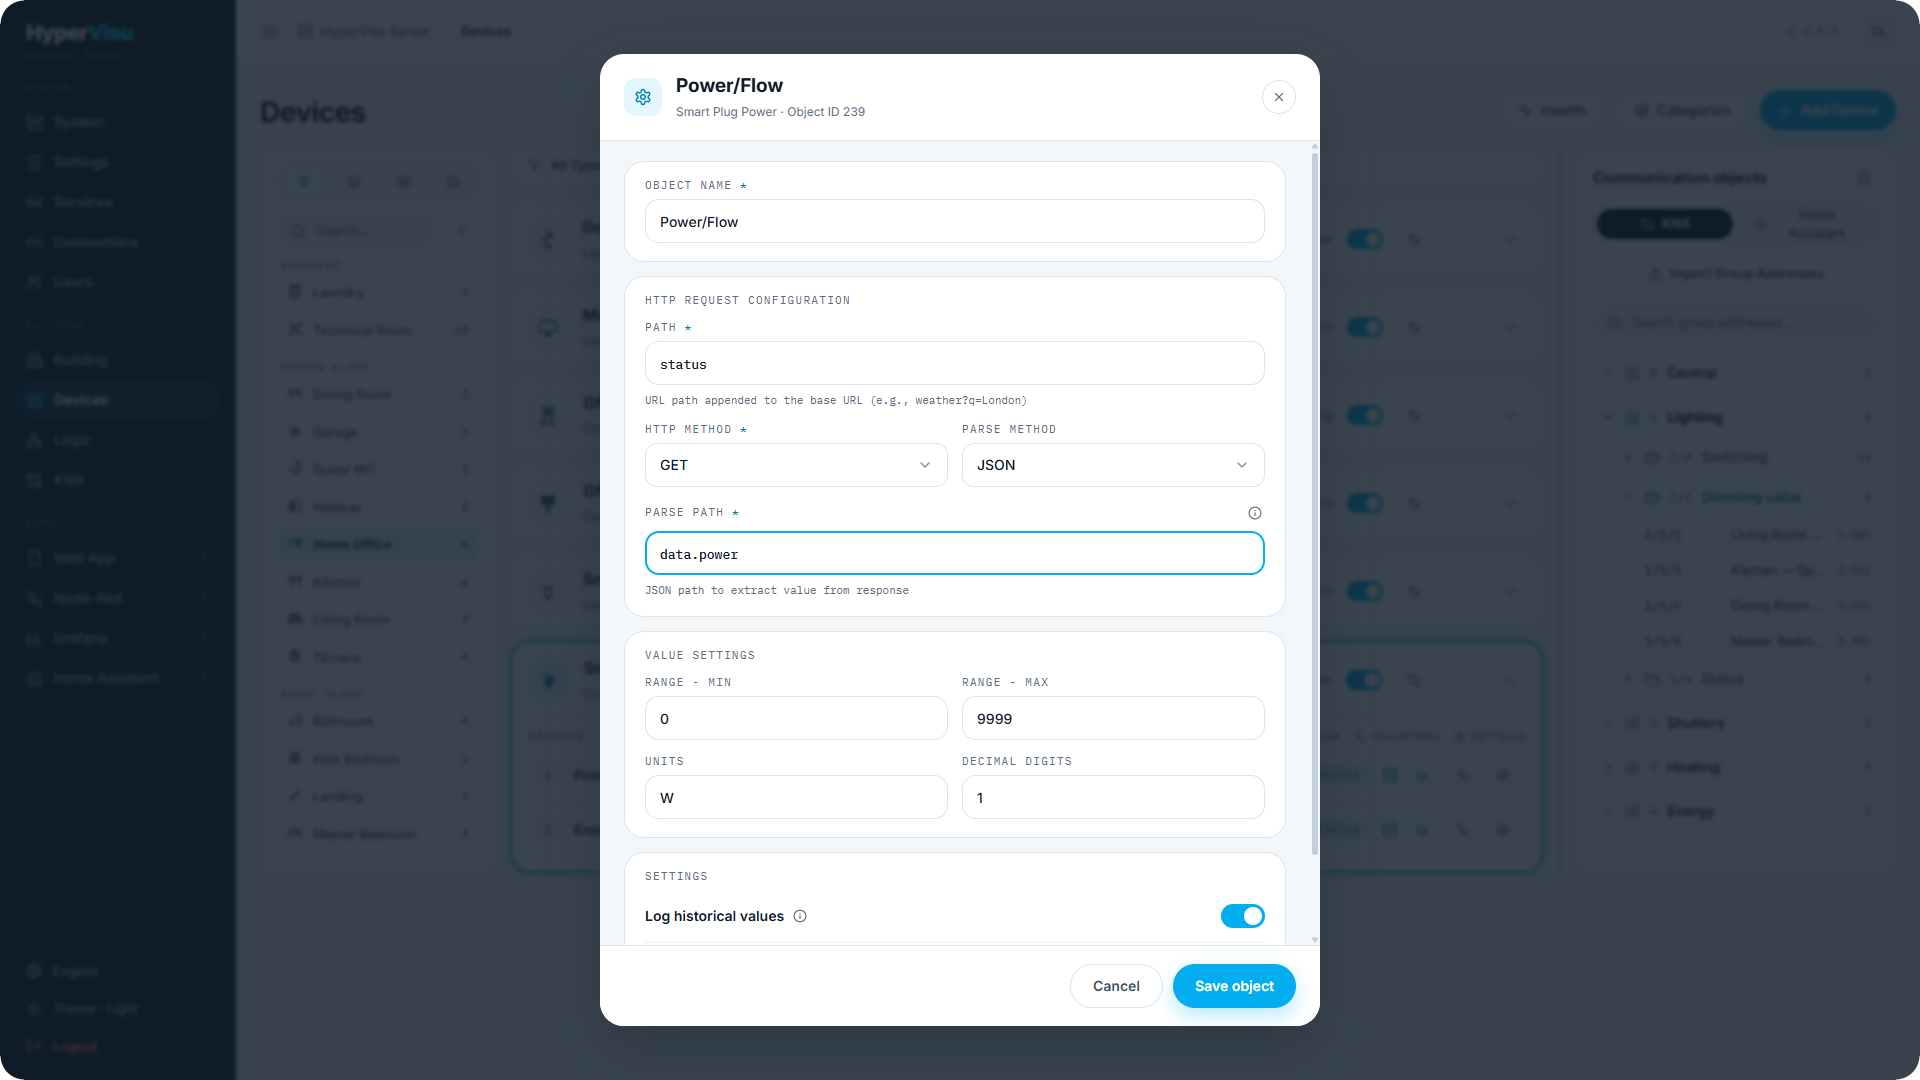
HTTP objects are also configured in the object settings dialog (see “Object Settings, Logging & Notifications”). The HTTP section defines one request per object:
| Field | Description |
|---|---|
| Path | Appended to the connection's base URL (e.g. weather?q=London). |
| HTTP Method | GET, POST or PUT. |
| Content Type | For POST/PUT: JSON, TEXT or FORM. JSON and FORM set the matching content type header; TEXT sends none. |
| Parse Method | JSON — the response is JSON and Parse Path names the value. Pattern Matching — the response is text and Parse Path holds a pattern. Inline syntax help documents both. Switching the parse method empties Parse Path, so choose the method first. |
| Parse Path | With JSON: a simple path — dot notation (data.power), an array index (sensors[0]), a negative index ([-1] for the last element) and an optional leading $.. Filters and wildcards are not supported. With Pattern Matching: the pattern, which must start with PATTERN= — e.g. PATTERN=Temp:\s\v. |
| Request Body Template | For POST/PUT: the body to send, with ${value} as the placeholder for the value being written — e.g. {"state":${value}}. |
Reading uses the connection's poll interval; a poll interval of 0 makes the endpoint write-only (see “Connections”). Polling always sends a GET to the object's Path; a POST or PUT object sends its request only when its value changes. A worked example is in the HTTP chapter.