
The built-in MQTT broker
HyperVisu can run an MQTT broker of its own, on the server. Devices then connect to HyperVisu directly instead of to a separate broker machine you have to install, secure and keep updated, and you bind their topics exactly as on any other broker (see “MQTT Integration”). The same broker can also carry the installation's own values outwards, so a dashboard, an energy system or another controller can read what the building is doing.
Use it when you have MQTT devices and no broker yet. If you already run a broker — the one inside a Zigbee2MQTT installation, a Mosquitto on a server, an EMQX — keep it: HyperVisu is a perfectly good client, and the built-in broker can stay off.
What you need: the MQTT protocol enabled (see “Services & Protocols”) so that devices can be bound, and one account per device that will connect.
Turning it on. The broker is an optional service, so it needs a restart to appear, and it is configured afterwards:
- Go to Services and switch MQTT Broker on in the optional services list.
- Click Restart Server and wait for the page to reconnect.
- Back on Services, click Configure on the MQTT Broker row. The MQTT Broker page opens.
ℹ️ Note: The toggle on the Services page starts and stops the broker; everything on the MQTT Broker page describes how it behaves. A change on the Services page needs a server restart; a change on the MQTT Broker page only restarts the broker itself.
Saving changes. Edits are collected until you apply them: a bar appears at the bottom of the page with Apply and Discard. Apply writes the settings and restarts the broker — connected devices reconnect by themselves within a few seconds. Re-apply, at the top of the Status panel, rewrites and restarts even when nothing changed; use it if the broker was stopped by hand or the page reports that the files on disk differ from the saved settings.
Status — is it running, and how do devices reach it
The Status panel is what you look at first.
- One card per listener — MQTT and WebSockets — each showing its address and whether it is Listening, gives No answer, or is Off.
- Address to enter in a device — the address to type into a Shelly, a Tasmota or a Zigbee2MQTT configuration, with a Copy button. It is the server's own address and the port of the plain listener.
- HyperVisu's own connection — the account and the connection HyperVisu itself uses to reach the broker. It is created automatically the first time the broker is used; Repair recreates it if the connection was edited or deleted.
If the broker was never started, the panel says the service is not running and points back to the Services page.
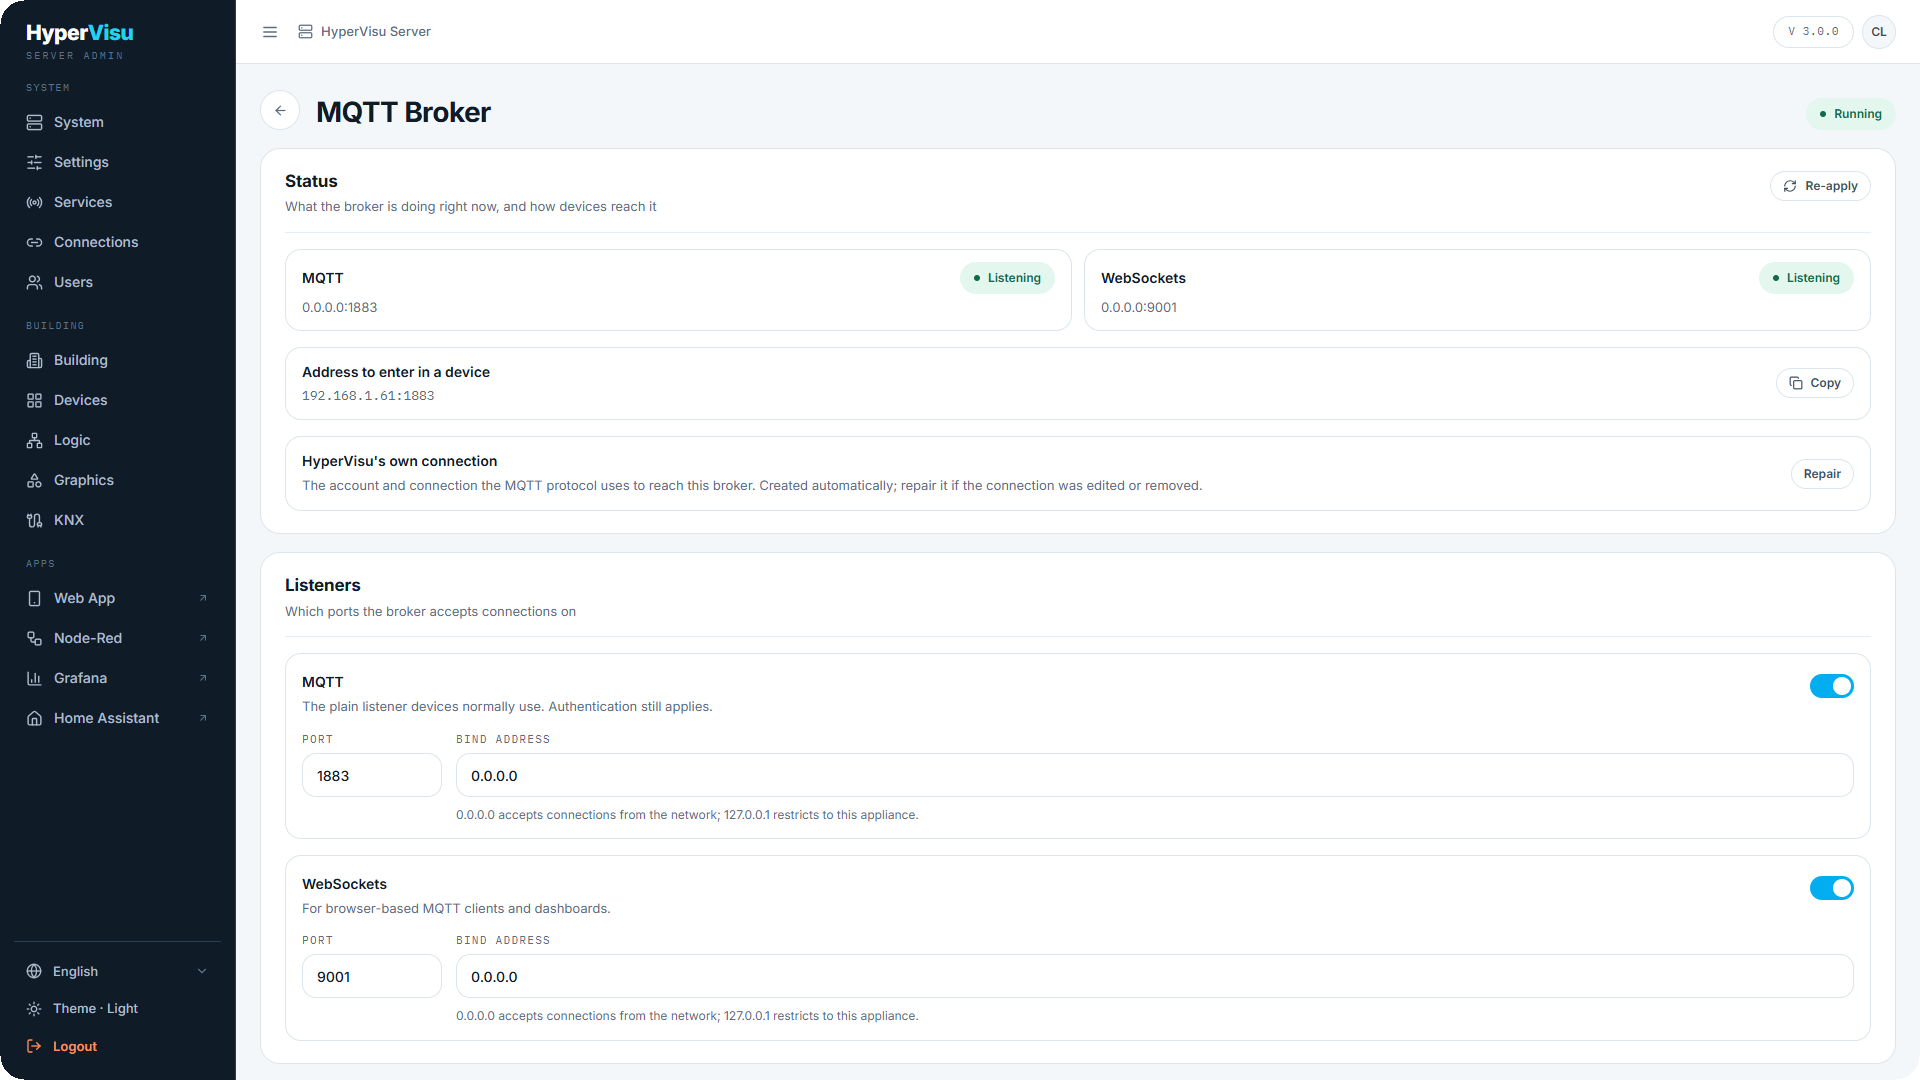
Listeners — which ports the broker answers on
A listener is a port the broker accepts connections on. Two are available, each with a Port and a Bind address:
| Listener | Default | What it is for |
|---|---|---|
| MQTT | port 1883, on | The listener devices normally use. Authentication still applies — this listener is unencrypted, not open. |
| WebSockets | port 9001, off | For MQTT clients running in a browser, and for dashboards that speak MQTT over websockets. |
Bind address decides who may reach the listener: 0.0.0.0 accepts connections from the network, 127.0.0.1 restricts it to the server itself.
At least one listener must stay enabled — with none, nothing could connect, and the page refuses to save. Two listeners cannot share a port, and ports already used on the server (the web interface, the history database, dashboards, Node-RED, camera streaming, Home Assistant, the HyperVisu API) are refused by name.
⚠️ Warning: Neither listener encrypts what it carries, so keep the broker on the local network. Bind it to
127.0.0.1if only the server itself needs it, and never forward its port from the internet.
Accounts and access — who may connect
⚠️ Warning: A broker with no restrictions is a way into the installation. Give every device its own account, and leave anonymous access off.
Accounts. Each device that connects needs a username and a password. Click Add account, enter a Username (letters, digits and . _ @ -) and a Password, then apply. The password is hashed the moment it is saved and can never be read back — only replaced, with the Password button on the account row. HyperVisu has an account of its own, marked as such; it is managed for you and cannot be removed.
The page refuses to save a configuration in which anonymous access is off and no account exists — nothing could connect, not even HyperVisu.
Anonymous connections. Allow anonymous connections lets any client connect without a username. It is off by default. If you switch it on while a listener is reachable from the network, the page shows a warning — This broker would be open to the whole network — and refuses to save until you tick I understand and want to allow this. Anyone on the network could otherwise read the installation's data and control it.
Topic restrictions. Without rules, every authenticated account may publish and subscribe to everything. Switch Restrict topics per account on and click Add rule. Each rule is an Account (type the username; leave it empty and the rule applies to anonymous clients), a Permission (read, write, readwrite or deny) and a Topic filter, where + matches one level and # the rest.
A typical set: the Zigbee gateway gets readwrite on zigbee2mqtt/#, a dashboard gets read on hypervisu/#, and nothing else is allowed anywhere.
ℹ️ Note: The rules are the whole list — an account with no rule matching a topic is refused on it. HyperVisu's own account is the exception: it always keeps full access, so switching restrictions on can never cut the server off from the topics its devices are bound to. A rule naming that account is ignored.
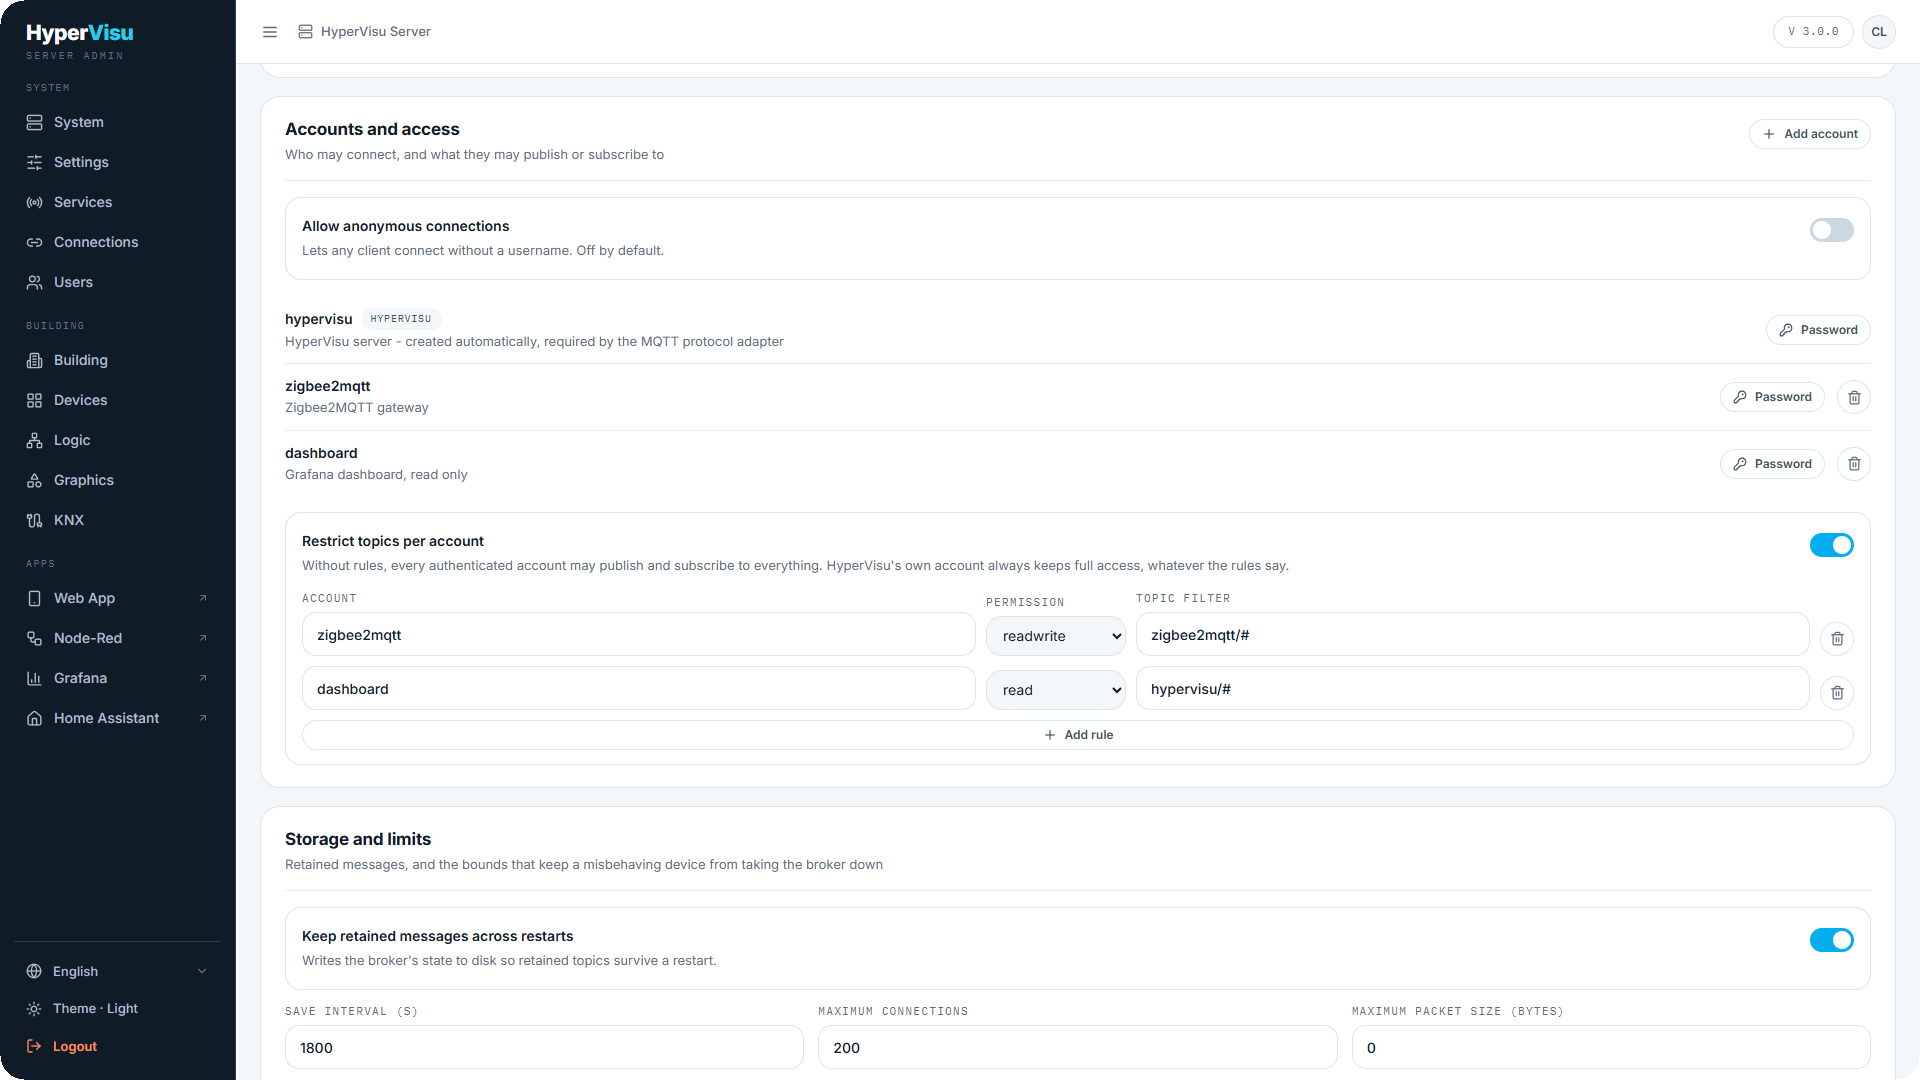
Storage and limits
These settings protect the server from a device that misbehaves, and decide what survives a restart.
| Setting | Default | What it does |
|---|---|---|
| Keep retained messages across restarts | on | Writes the broker's state to disk, so retained topics are still there after a restart. Without it, every retained value is lost when the broker stops and widgets wait for the next device publish. |
| Save interval (s) | 1800 | How often that state is written. Longer means fewer writes to the server's memory card. |
| Maximum connections | 200 | How many clients may be connected at once. -1 for unlimited. |
| Maximum packet size (bytes) | 0 | The largest message the broker accepts. 0 means unlimited. |
| Allow retained messages | on | Whether devices may ask the broker to remember their last value for new subscribers. Turning it off makes every widget wait for a fresh publish after a reconnect. |
💡 Tip: Leave retained messages on. They are what lets the app show real values the moment the server comes back, instead of empty widgets.
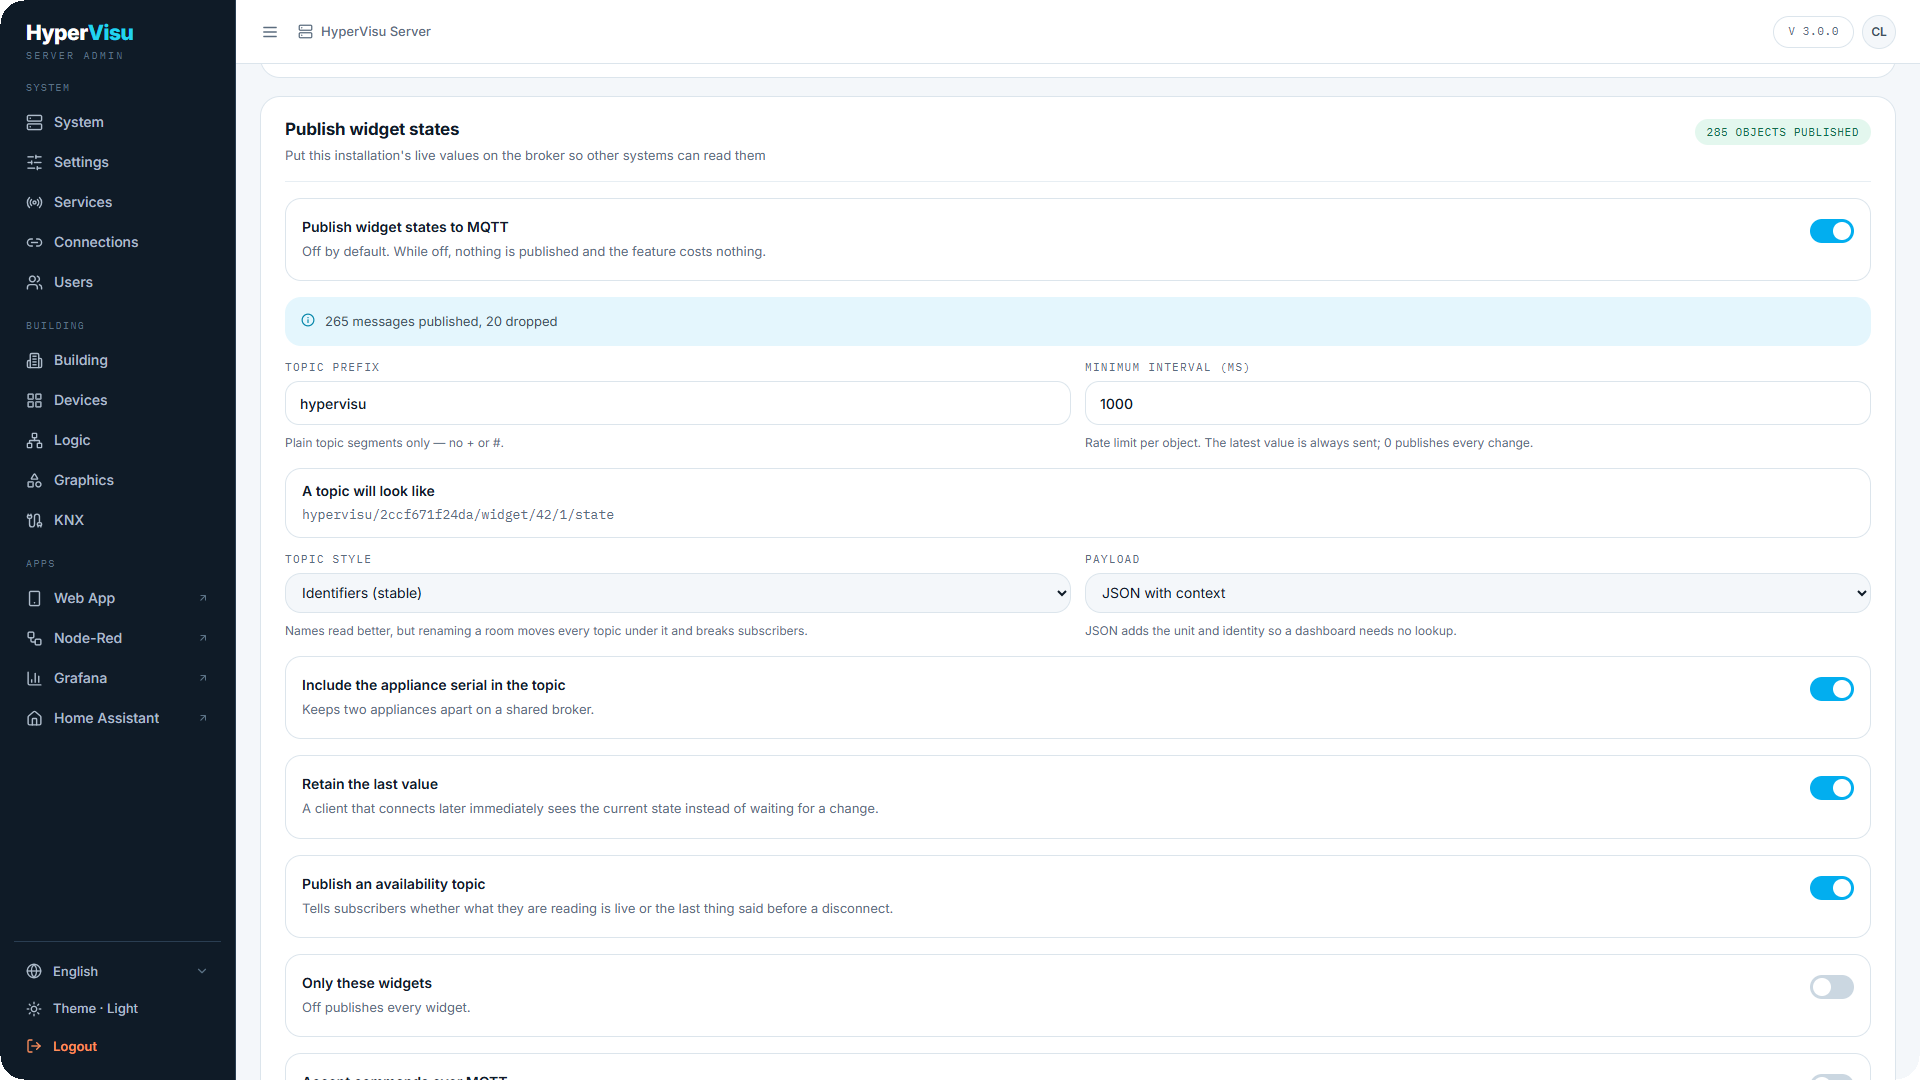
Publishing widget states to MQTT
HyperVisu can publish its own devices' values onto the broker, so other systems can read the installation without touching HyperVisu itself: a Grafana dashboard, an energy manager, a third-party controller, another building system.
It is off by default, and while it is off nothing is published at all. Switch Publish widget states to MQTT on and the settings appear:
| Setting | Default | What it does |
|---|---|---|
| Topic prefix | hypervisu | The first segment of every topic. Plain topic segments only — no + or #. |
| Include the appliance serial in the topic | on | Adds the server's serial number after the prefix, so two installations can share one broker without colliding. |
| Topic style | Identifiers | Identifiers (stable) uses the internal device numbers; Names (readable) uses room and device names. Names read better, but renaming a room moves every topic under it and breaks whoever subscribed. |
| Payload | Value only | Value only publishes the bare value; JSON with context publishes the value together with the device's name and room, its unit, its identity and a timestamp — so a subscriber can read a message without knowing what widget/42/1 is. |
| Minimum interval (ms) | 1000 | Rate limit per object. The latest value always arrives; 0 publishes every single change. |
| Retain the last value | on | A client that connects later sees the current state immediately instead of waiting for the next change. |
| Publish an availability topic | on | Publishes online / offline, retained, on <prefix>/<serial>/status, so subscribers know whether what they read is live or the last thing said before a disconnect. Switching publishing off retracts it. |
| Only these widgets | off | Off publishes every device. On, pick exactly which ones. |
| Accept commands over MQTT | off | Lets a subscriber write values back. See the warning below. |
The page shows A topic will look like with a live example as you change the settings. With the defaults, a device's value lands on:
hypervisu/<serial>/widget/42/1/state
and with Names (readable):
hypervisu/<serial>/living-room/ceiling-lamp/1/state
The last segment before state is the object number of the device — one topic per communication object, not one per device.
With JSON with context, the message itself says what it is:
{"value":21.5,"unit":"°C","name":"Hall thermostat","room":"Bathroom","widget":46,"object":2,"type":"FLOAT","ts":"2026-09-09T07:51:22.436Z"}
The name and the room are read at the moment of publishing, so renaming a device changes the next message without moving any topic. That is the difference from Names (readable): readable topics move when you rename, a readable payload does not.
Accepting commands. With Accept commands over MQTT on, publishing a value to the matching …/set topic changes the device, exactly as if the app had done it.
⚠️ Warning: This lets anyone who can publish to the broker control the building. Only switch it on with anonymous access off and topic restrictions in place — the page refuses the combination of commands and anonymous access outright.
Commands are refused, and counted as refused, when the topic belongs to a read-only object or the payload cannot be read as the object's type. The panel shows how many messages were published and dropped, and a badge with the number of objects currently published.
ℹ️ Note: Publishing needs the MQTT protocol switched on and a connection to a broker. Enabled without one, the panel says so instead of pretending to publish.
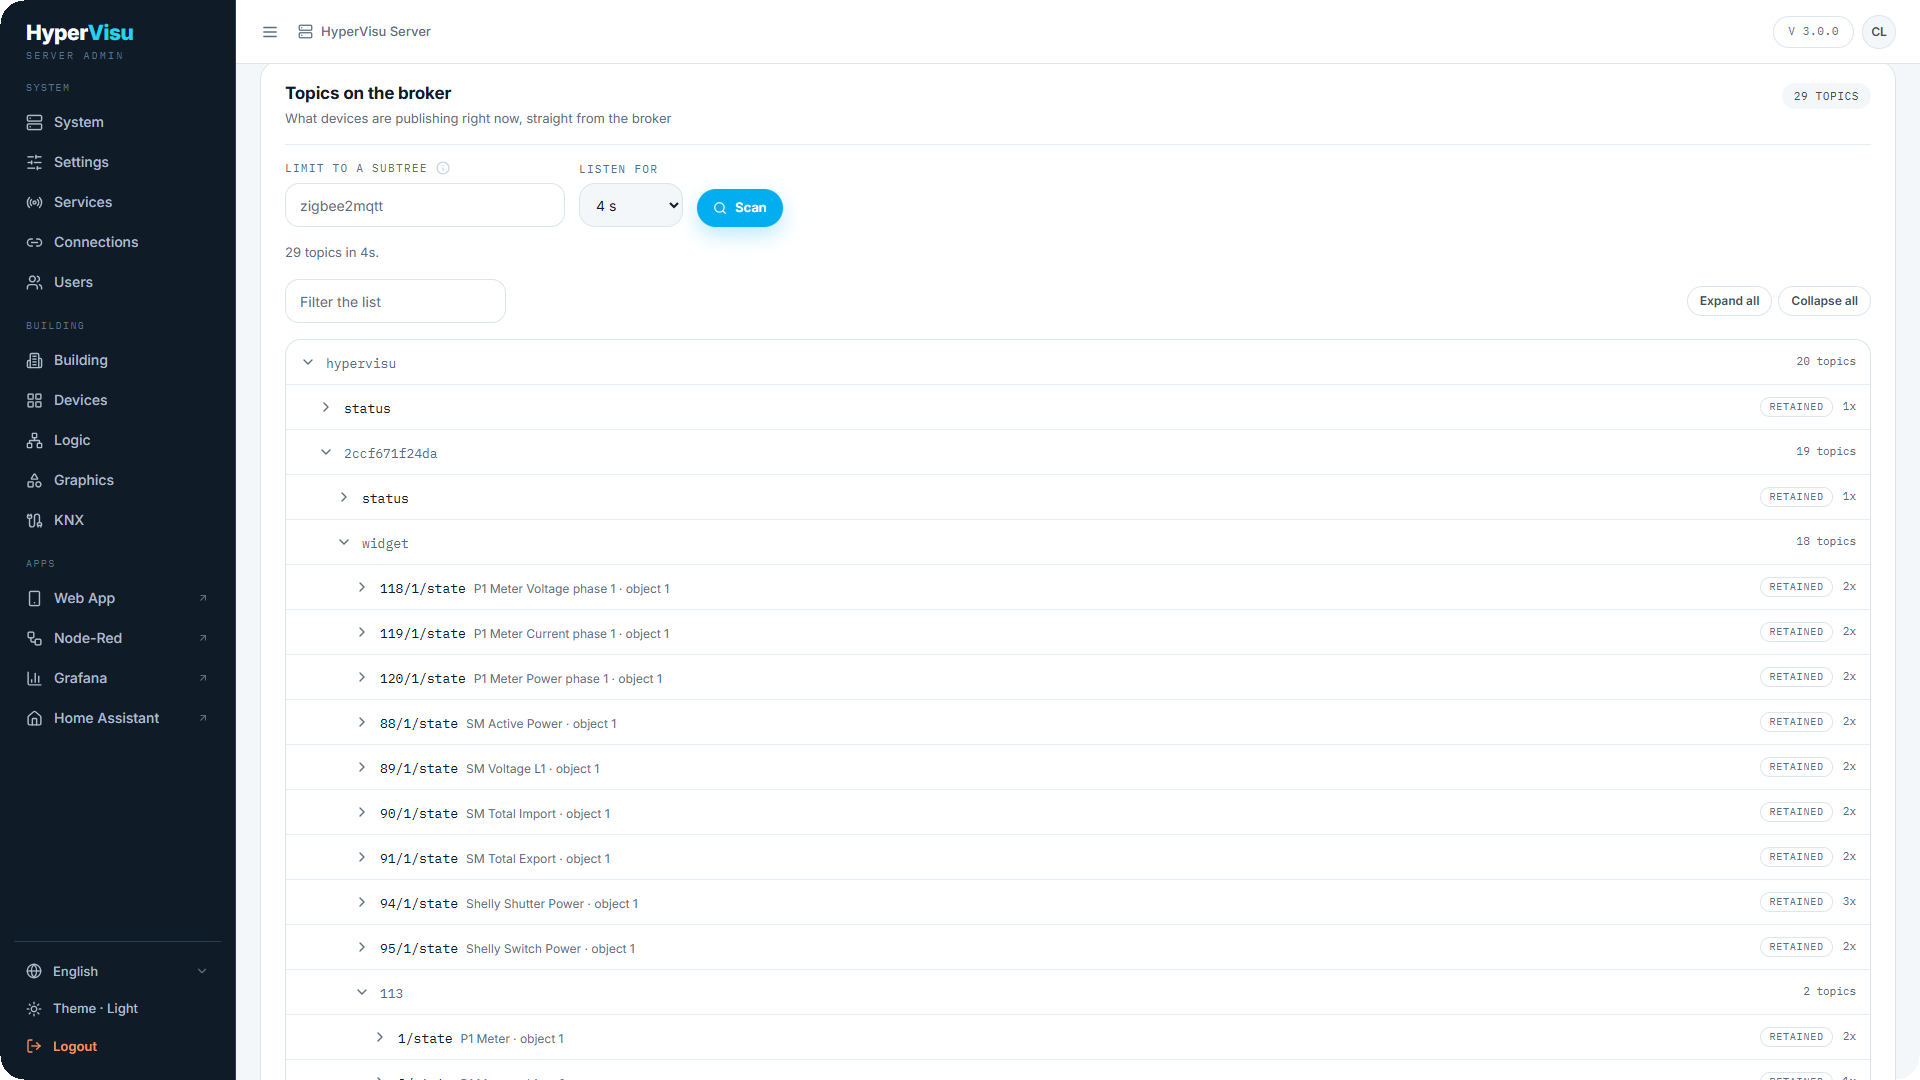
Browsing the topics on the broker
Topics on the broker, at the bottom of the page, shows what is actually happening on the broker right now — the fastest way to tell whether a device you just configured is really talking.
- Optionally fill Limit to a subtree to narrow the scan (
zigbee2mqttscanszigbee2mqtt/#only). - Choose how long to Listen for — 3, 4, 10 or 30 seconds.
- Click Scan.
The result is a tree, following the / levels of the topics themselves, so a broker carrying hundreds of topics stays navigable. Click a branch to open it — the row shows how many topics sit below — and click a topic to see its last payload. For a JSON payload the fields are listed underneath with the type each one reads as; for a plain payload, the type it was recognised as. The copy button on the open row copies the full topic. Expand all and Collapse all are above the tree, and a small scan opens expanded.
A level with only one child is merged into its parent (118/1/state on one row rather than three), so a deep prefix costs no clicks. Retained topics come first at every level.
HyperVisu's own published topics are named where it can: a topic such as hypervisu/<serial>/widget/42/1/state is shown with the device it belongs to beside it, so you do not have to look the number up.
Retained topics are replayed by the broker the moment the scan subscribes, so even a short scan shows the whole retained tree. If a scan finds nothing, either no device is connected yet or the devices only publish on change — try a longer window.
ℹ️ Note: The scan reads the broker as it is running now, so unsaved changes higher up the page are not part of what it reports. The panel says so while there are unsaved changes.
The scan is read-only: it shows what is there and never publishes. To bind one of these topics to a device, open the device's object and pick the topic in the object editor (see “MQTT Integration”) — the same scan is available there, and it fills the type, the JSON path and the ON/OFF tokens for you.
Worked example — a Shelly plug on the built-in broker
A Shelly Plus plug should be controlled by HyperVisu, with no broker on the network yet.
- Services → switch MQTT Broker on → Restart Server. Make sure the MQTT protocol is on as well.
- Services → Configure on the MQTT Broker row. In Accounts and access, click Add account: username
shelly, a password of your choice. Click Apply. - Note the Address to enter in a device from the Status panel — for example
192.168.1.60:1883. - In the Shelly's own web interface, enable MQTT, enter that address, the username
shellyand its password, and save. The plug reboots and connects. - Go to Connections. A panel offers Use the local broker; click it, and HyperVisu creates its own connection to the broker. If you have already done this once, the connection is there — the topic browser needs it, so do this before scanning.
- Back on the MQTT Broker page, open Topics on the broker and click Scan. The plug's topics appear —
shellyplus1pm-a8032ab1/status/switch:0and others — with their last payloads. - In Devices, add a Light switch widget "Kitchen plug", protocol MQTT, on that connection, and bind its objects to the plug's topics with Scan broker in the object editor.
- Switch the plug in the app. The command goes out over the built-in broker, and the plug's own state topic confirms it.